In a domestic car, the VAZ 2110 radiator is the device that allows you to remove unnecessary heat from the engine cooling system fluid.
This device consists of:
- core (the so-called cooling part);
- bottom and top boxes (or, in other words, tanks) with nozzles.
The core is tubular-lamellar. It is made from brass. By appearance these are rows of oval tubes that are staggered. These tubes are soldered with special cooling fins. The upper tank of the device is equipped with a filler neck, which has a sealed plug, complete with outlet and inlet valves. The lower tank is equipped with a faucet. Through it, the coolant is drained.
Which engine radiator to choose and which heater?

A car is a complex device that consists of various systems. One of them is the (CO) cooling system power unit. If any part of it fails, a number of problems immediately arise. Home - engine overheating. Most often this happens because the radiator does not work well.
At the same time, every driver wants to feel comfortable at any time of the year, and especially in winter. This involves creating a warm, cozy environment in the cabin. But often, due to clogging of this automotive component, as well as corrosive processes, the VAZ 2110 heater radiator fails and requires repair or replacement.
Therefore, let's try to figure out which unit is better to choose for the engine and for the stove, so that it lasts a long time and reliably. Such a high-quality device will help in the operation of the cooling system in particular, and the entire car as a whole.
Most often, the repair of this device is required due to its lack of tightness (leakage). This is affected by corrosion and, of course, the quality of the materials used in its manufacture. In order for this automotive part to last longer, it should be looked after. Dirt, dust, leaves pollute the VAZ 2110 cooling radiator and it begins to “perform its duties” much worse.
As a result, as soon as summer begins, it is better to wash it. You can, of course, clean it from dirt with your own hands (more on that below), and you can also visit a car wash. These devices are distinguished by composition, namely: aluminum and copper. Let's consider them in more detail:
- aluminum models are less expensive and lighter. However, they also have disadvantages. These include lower thermal conductivity and greater susceptibility to corrosion.
- copper analogues are distinguished by the strength of the metal, durability (they better resist corrosion). Also, copper has a higher thermal conductivity, and, accordingly, a higher efficiency.
I would like to note that often firms produce radiators for both the engine and the heater. The model will depend on the volume of the power unit. A device (old-style) is suitable for 1.5 liters, but a heat-removing “detail” from Priora (this is a new model) is perfect for a 1.6-liter engine. But before buying, you must definitely check what type of device (radiator) your car is equipped with.
How to remove the VAZ-2110 cooling radiator?

The cooling system of the car 2110 is a closed type, liquid, with forced circulation. General tightness is ensured by the exhaust and intake valves, which are placed in the plug expansion tank cars.
Thanks to the exhaust valve, the necessary increased (compared to atmospheric) pressure in the system on a hot engine is maintained (the temperature at which the liquid boils increases, as a result, steam losses are reduced).
At a pressure of 1.1-1.5 kgf / cm2, it opens. If the pressure drops, the intake valve opens. The entire thermal regime of the power unit is supported by an electric fan and a thermostat. The fan is turned on by a sensor that is screwed into the left tank. If you need to remove the radiator, then:
- on a cold engine;
- dismantle the electric fan;
- slightly loosen the clamps and, then, carefully remove the inlet and steam outlet hoses;
- then loosen the clamp and remove the outlet hose.
- tilt the radiator to the motor and remove it.
- at the bottom of the device focuses on two rubber pads. During assembly, they must fit firmly into the holes in the crossbar.
Assembly is carried out in the reverse order of disassembly.


Heater Radiator Replacement
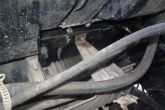
One of the main reasons why they arise is the flow of antifreeze. Most often, antifreeze runs out directly from the radiator or through holes due to loose hoses. The process of removing and subsequent replacement of this part of the auto topic is very specific, about it in detail below. Now I would like to note that to replace it, it is not necessary to remove the panel in the cabin. All actions take place exclusively under the hood.
There are VAZ 2110 heaters:
- old model (until September 2003);
- new sample (after September 2003).
The procedure for replacing a device with a new and old model does not differ much, but still, there are differences. At first, the procedure is the same.
- this can be done from the engine block. To do this, unscrew the tank cap (this is necessary for the pressure to drop) and the drain plug, which is located behind the ignition module. Close to four liters of antifreeze should run out into the substituted container.
- can also be drained through the expansion tank. To do this, you need to remove the hose from the stove and, thus, 1 liter of antifreeze is poured out. Then remove the rubber pipe and loosen the three clamps. Further, depending on the type of heater (old or new), the procedure is somewhat different.
1. Replacing the heater radiator of the old model
Remove the car rubber windshield seal and jabot. Unscrew the screw that secures the frill (under the main brake cylinder) Unscrew the four screws on the right side of the frill. We unhook the two clamps on the frill that secure the hoses and wires.
Carefully disconnect the "minus" wire of the fan from the machine body, and also disconnect the positive terminal. Then we unscrew the two screws of the frill (left side) and move it forward a little (but do not remove it completely). dismantle the windshield cover. After that, it is necessary to disconnect the terminal of the sensor that monitors the coolant level.
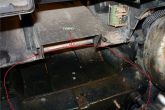
Next, remove the steam outlet hose from the expansion tank. Following further, disconnect the washer hose. You also need to unscrew the four screws. We dismantle the windshield wipers and the windshield trim. After that, we need to remove the clamps of the stove body and fan. However, not all. Heater housing clamps only.
The next step, unscrew the screws of the filter and the front of the fan (they are the same, the only exceptions are four long ones. It is better to remember their location). Now remove in front of the stove fan. After - remove the filter housing. Next, you can remove the back of the fan. Now we loosen the clamps a little and proceed to remove the supply hoses, the steam outlet hose and the antifreeze “return”.
We remove the leaking radiator. We perform the necessary actions and assemble everything in the strictly reverse order. It is important to take into account some points during assembly: it is necessary to correctly mount the plastic housing of the “heating” fan so that the pedal fits into the desired groove. There should be no extra bolts, all parts should fit snugly. If this does not work out, the micromotor reducer will not be able to move the dampers and the stove will not heat up.
2. The heater of the new “type” is attached to the car body as follows:
- screw in the middle, which is located at the bottom windshield;
- 2 nuts are placed above the exhaust manifold;
- 1 nut is in the left corner (close to the filter).
It is necessary to remove the washer fluid reservoir of the engine rear window, if any. We remove the filter, which is attached to the heater with a plastic cover for 4 self-tapping screws. The oven consists of 2 parts. They are connected with three screws. The heater fan is equipped with an air supply hose. You can look through it and see a self-tapping screw that needs to be removed along with two smaller screws.
We separate the oven into two parts. This is done in the following way. We take the corresponding part of the device with each hand and turn it up a little and, further, carefully remove the right side, and after that, the entire part. We remove the right side. After that, dismantle the steam outlet hose. The right side, like the left one, consists of two parts. They are connected with iron brackets.
They need to be removed. The part will fall into two parts (here, between them, there is a seal). Now we will get access to the damper. It is better to use a new aluminum damper. After completing the necessary steps, we assemble in the reverse order.
Do-it-yourself radiator cleaning
There are situations when you notice that the engine starts to overheat. In this case, it is necessary to check how the car's engine cooling system works. The main "blow" from dust, dirt, poplar fluff, as well as leaves takes on the radiator. As a result, it heats up and fails. Therefore, let's try to figure out how and, most importantly, how to clean it.

The concept of "cleaning" the radiator can be considered mainly from the following two positions: in the first case, if it needs to be cleaned from the outside, that is, to wash its surface. The second option is to rinse the insides of this device. The methods presented will achieve some positive results, however, they requires a very different amount of effort and time.
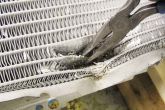
In the photo you can see the radiator, which is contaminated with poplar fluff. Next, we will consider how best to clean it from dirt (before work, you must make sure that it has cooled down).
1. We clean the radiator from the outside
If you need to clean the cells of the device, then you can apply the following options:
- rinsing with Karcher. This type of washing is based on a special high-pressure water cleaning technology. This method is very effective, but there is also negative feedback(complain that honeycombs are bent in this way). But in reality, you just need to learn how to use the sink correctly. In order to safely use Karcher, it is better to use not a “cutter”, but a “vario” as a nozzle. You can use the maximum speed. However, point-blank washing is not recommended. Better at a distance of 30-50cm. In this case, the angle must be right;
- there is also a similar method, but here air is used instead of water. The result is cleaning with compressed air. Without a doubt, there will be a positive effect, but how much it will take to wash the radiator is up to you;
- Another option if you decide to clean the heat sink is using a nylon brush and soapy water. Actions should be performed in the direction of the radiator mounts, otherwise the metal will be damaged. The cleaning agent must be applied directly to the unit, wait for a while (information on this is contained in the instructions for the agent) and wash off the dirt with a regular watering hose.
2. Cleansing inside
If in the case of external cleaning, all actions can be performed directly on the car, then for internal cleaning, removal is indispensable. First you need to drain the coolant. For this:
- place a container under the valve;
- unscrew the cover;
- turn off the valve;
- when all the liquid runs out, close the valve.
To clean the "core", you need to send a jet of water inward. When the radiator is full, you need to drain the water using a valve. This procedure should be carried out several times. If the contamination is strong enough, special cleaning fluids can be used. When cleaning is completed, install the radiator in the car.
Don't forget to bleed the air pockets. This requires the engine to run with the lid open for about 15 minutes. Then you should turn on the heater to the maximum. Thus, the coolant will begin to circulate and the air will disappear. Another way is to drive the front wheels to a hill. After that, you need to let the engine run for several minutes at high speeds.
Do-it-yourself VAZ 2110 radiator repair
If the VAZ 2110 radiator is leaking, then there are certain malfunctions that should be taken into account. In this situation, many owners resort to replacing it. However, oddly enough, in most cases you can get by with the usual, and not with the purchase of a new unit. Often you do not need to have special skills, but there are cases when you cannot do without knowledge in the field of soldering and welding. To do this, you should learn to determine the real condition of the car and after that already proceed with the repair on your own.
The most common problem is device leakage. The coolant in such situations runs out of the metal and plastic attachment points, and this leads to overheating of the power unit. It is not always possible to find a new device, and repairs, in turn, will cost 2 times cheaper. Next, we will talk about the repair of the heater radiator and engine cooling system.
1. Repair with chemistry
Minor damage can be repaired using special means, namely, a liquid for restoring a radiator, powder reducing agents or a sealant. The principle of their operation is approximately the same: the agent must be poured into the engine cooling system. The resulting mixture plugs cracks if it comes into contact with air.
Of course, not all chemistry is the same, therefore, in general, it is not necessary to answer for the quality. For example, a low-quality reducing agent can do harm. It will clog the entire cooling system. Thus, the stove will stop heating and, as a result, it will be necessary to flush the system or replace the stove radiator. Thus, for repair chemistry is only a temporary solution to the problems that have arisen.
2. There is also a folk repair method
It lies in the fact that the patching of holes occurs due to cold welding (a plasticine-like material is used that hardens after use). First you need to degrease the surface, and then close up the holes. In a situation where the hole is large, it is necessary to use a piece of tin as a patch.

3. You can also repair honeycombs with a mixture of epoxy and hardener
First, we degrease and then pour the resulting substance into the damaged honeycombs. Using a spatula, smooth it out. Thus, holes will be sealed. This method involves the use of many materials. However, whether such an approach can be called a quality repair is up to you.
4. You can try to repair the radiator by soldering
The repair site should be cleaned well and a piece of sheet brass (brass devices) should be soldered to it. In such a situation, you need to use a gas burner and a soldering iron. If the tubes are cracked, it is better to replace them with new ones. The solder should be heated until it becomes soft. Then we pull the tube out of the tank and

Solder a new one in its place. The main disadvantage of this method is that exposure to high temperatures leads to deformation of the elements of the unit. Thus, we came to the conclusion that it is better to use argon-arc welding for repairs.
Here, the filler material is a special welded wire (aluminum). It also requires special equipment. It should be noted that the places that will be treated with argon are protected from oxidation.
Radiator grille upgrade

In addition to the bumper grille, you can also fine-tune the grille. If you complete the car with a mesh, then the upper grille will not only play the role of protection, but also look aesthetically pleasing. The factory grill is constantly “wearing out” by time, flies, roads, leaves. As a result - the varnish peels off, peels off in places.
The appearance is not attractive and something needs to be done about it. First you need to remove the grate, scrape all the animals out of it. Then everything should be washed well. After, you can start the "pattern" from the grid. Everything needs to be accurately measured. Next, you need to remove the old varnish, degrease and paint all the elements.
Color design can be very different. Everything needs to dry. Next, using a screwdriver and pliers, you should fix everything. In the end, it will turn out, as in the photo.


Refinement of the fan VAZ 2110

Since the fan of the VAZ 2110 engine cooling system only works at one speed, many owners do not like the peculiar spasmodic behavior of the arrow on the instrument panel. In addition, I want to smooth out the sudden shutdown of the fan. But first, the main disadvantages of the cooling system should be noted:
There is the effect of "thermal pumping" (the temperature, if it's hot outside, constantly fluctuates);
Shock electrical loads on the automotive on-board network.
Let's now take a closer look at the operation of the radiator fan: many owners of the VAZ 2110 do not like that if the weather is hot outside and the car is not moving fast, the coolant temperature rises close to the red zone on the dashboard of the corresponding sensor, and then the fan starts and the arrow falls down. She is swaying. Perhaps the panel is lying.
But the effect is still unpleasant, it is alarming. All drivers probably want to make “control” for temperature regime smoother. Owners want the temperature to be kept constant at the same level.
There is a constant debate about this, but there is a solution to this problem.
Option 1. The first method involves reducing the rotation speed of the Carlson and starting the electric motor more smoothly, at a low coolant temperature. But this option is relatively difficult for a person who is not versed in car electrics. In general, the whole structure will not look very reliable due to the large number of wires.
Option 2. This method is somewhat simpler than the previous one. It implies the forced activation of the fan from the button. After such refinement, the interior will be supplemented with one more detail, namely, a button. In the summer, standing in a traffic jam, you can press it and the interior will be filled with the measured rumble of the Carlson. It works at low speeds while the button is pressed (this speed is enough so that the coolant temperature does not exceed 90-95 degrees). However, if it rises above the marked indicator, then the factory second maximum speed will turn on.
Option 3. This approach, according to motorists, is, although not the cheapest, but probably the most correct and, more importantly, reliable. It involves the installation of a Smooth Control Unit for the Electric Fan of the Car Radiator. In general, this is a combination of advantages and a qualitative elimination of the shortcomings of cooling systems due to the introduction of a new algorithm, the so-called smooth control, which regulates the rotation speed of the electric fan. As a result, the engine temperature stabilizes. The cost of such a device is close to 1200r.
Option 4. Another option is the Fan Start Controller (RPV) of cars. This adapter is installed in a break in the power supply circuit of a car fan. It makes it turn on more smoothly, and this increases the life of the fan.
How to eliminate vibration and fan noise

When the radiator fan turns on, there is a sharp increase in noise and vibration in the VAZ 2110 cabin. Usually, at such a moment, passengers jump and make big, frightened eyes. Something must be done about this. There can be many reasons for noise, vibration and fan hum.
Here are the main ones. Let's start with the simplest ones:
- the bolt that attaches the plastic fan to the pulley has been unscrewed;
- the radiator is not inserted into the socket and simply lies on the suspension;
- part of the impeller blade broke off, resulting in an imbalance;
- there is dirt on the impeller, there is also an imbalance (it needs to be cleaned);
- due to the fact that the pillows are pressed, the motor does not hold and there is vibration (you need to change the pillows, install special rubber gaskets);
- no lubrication, the fan is buzzing (it is necessary to lubricate the electric motor);
- broken bearing (it needs to be replaced).
To balance the impeller, you must:
Option 1. Having wound the wire on the blades, we check the imbalance. Gradually align, until silence.
Option 2. It is necessary to insert a part that fits in diameter (drill) into the hole. Place the impeller with its axis on two horizontal supports. If there is an imbalance in this situation and the impeller tends to take an incomprehensible position in space, this malfunction should be eliminated by turning the blades. You can also glue the weight inside the impeller.
If, after the above reasons, vibration and noise remain, then the fan impeller should be changed, which will have eight blades (four-blade comes from the factory). Or finally. After replacement, the fan will not work worse for sure. Most often, after replacing the fan with an eight-bladed one, vibrations and noise disappear, and driving in a car will now be very comfortable.
In contact with
Classmates
Found an error? Select the text with the mouse and press Ctrl+Enter
One of the reasons replacing the stove radiator with a VAZ 2110 is the flow of antifreeze. Usually antifreeze runs out of the heater radiator or due to loose hoses. Because without dismantling the motor shield the reason for the leakage of antifreeze cannot be determined, therefore it is better immediately replace the heater core with a new one.
Process removal and replacement of the radiator can be traced in the documentation from the VAZ 2110 repair book. I note right away that You don't need to remove the panel to replace the heater core., the entire replacement procedure takes place exclusively under the hood.
Heaters VAZ 2110 distinguish:
Procedure replacement of the stove radiator of the old and new models will not differ significantly, but I will still tell separately.
So, we buy everything you need to replace the radiator (you will need at least 4 clamps) and take a short Phillips screwdriver with tweezers (they will help when installing hard-to-reach latches). It is important to choose a good heater radiator! 


Drain antifreeze:


Replacing an old-style stove radiator
 |
We remove the rubber seal of the wind pad (frill) and the frill itself. |
 |
We unscrew the screw fastening the frill (it is under the main brake cylinder) |
 |
|
 |
|
 |
|
|
Power Steering Vaz With Us You Will Find Any Auto Parts At Favorable Prices For Your Car! avtobazar.ua |
|
 |
We unscrew the two screws on the left side of the jabot and move it a little forward (it is not necessary to remove it completely). |
 |
We remove the windshield trim, there are 2 nuts (for 10), and 5 screws |
 |
Disconnect the coolant level sensor terminal (if any) and remove the steam outlet hose from the expansion tank. |
 |
|
 |
|
 | |
 |
Heater housing clamps. |
 |
We unscrew the screws of the cabin filter housing and the front of the fan housing (all the screws are the same except for the four long ones, remember their location. |
 |
Remove the front part of the heater fan housing (with fan). |
 |
|
 |
|
 |
We loosen the clamps and remove the supply hoses, antifreeze return pipes and the steam outlet hose. With a little effort, remove the leaking heater core. |
 |
|
Important points when assembling an old-style heater in reverse order:
It is necessary to correctly install the plastic housing of the stove fan so that the pedal falls into the desired groove. Also, there should not be any extra bolts, everything should fit snugly. 🙂 Otherwise, the micromotor reducer will not move the stove dampers, that is the oven will not heat.


Bogdan - ten from Ukraine! Find out what characteristics Bogdan has in comparison with Lada. Facts about it..motorpage.ru
Video instruction for replacing the radiator of the VAZ 2110 stove (old model)
Replacing a new stove radiator
The heater of a new sample is attached to the body in the following places:
If there is a rear window washer fluid reservoir, then it must also be removed.
The air filter is pressed against the heater with a plastic cover, which is attached to 4 self-tapping screws, remove the filter.
The heater of the new sample consists of two parts, which are connected by 3 self-tapping screws. An air supply hose goes to the heater fan (it is bent with the letter 'G'). If you look through it, you will see a large self-tapping screw, unscrew it and two more smaller screws from the front side of the heater.
We separate the heater into two parts, for this, move the right side as far as possible to the right, and remove the left side like this:
We take the left side with the left hand, and the right side with the right hand and turn it slightly upwards from us and bring out the right side first, and then the whole part. 


Without much effort, remove the right side. We remove the steam outlet hose through the hole in the right half of the noise insulation of the bulkhead. 


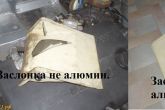
The right side of the heater also consists of two parts, which are connected by iron brackets. We remove the brackets and it will fall into two parts (there is a seal between them). We get access to the shutter. It is better to use a new glued aluminum damper. 
Important points when assembling a new heater in reverse order:
Video instruction for replacing the radiator of the stove VAZ 2110 (new model)
Summing up
To replace heater core it will take time:
- Disassemble heater VAZ 2110- 2.5 hours
- Install heater in reverse order it took 4 hours already.
Because It takes a lot of time to disassemble the motor shield, then along with replacing the stove radiator, it is recommended to perform other operations that also require disassembling the heater. (for example, simplify the replacement of the air filter, make noise insulation)
After we assembled the heater and topped up the antifreeze, we check the operation of the stove. If the stove radiator pipes do not heat up, then the reason is probably - air lock in the engine cooling system. How to expel air from the SOD is described in the article on repairing the VAZ 2110 heater.
Conclusion  Do-it-yourself stove radiator replacement not complicated, but rather lengthy process, on which you will save about 1.5 thousand rubles. After replacing the heater core stove performance should improve noticeably (No Ratings Yet)
I am the owner of a VAZ 2110. It is clear that this is far from a foreign car, but my car completely suits me. Good dynamism, simple and easy control, low gas mileage. What else do you need for daily trips around the city?
A few years ago, I ran into the problem of replacing the radiator of the VAZ 2110 stove. I noticed a leak of antifreeze. As experts explained to me, the reasons for such a breakdown can be very different. In order to eliminate such a nuisance, it is necessary to remove the motor shield. In a car service, I was advised not to suffer and puzzle over, but to immediately install a new device.
Having learned the price of replacing the stove radiator for the VAZ 2110, I decided to make it on my own. Along with the work, the workers wanted 3,000 rubles. Maybe I went to the wrong place, but it seems that I have known the guys from the car service I have chosen for a long time. There is no reason for them to cheat. I understand cars well, so I did not spend money on car service services. In my possession was a book of instructions for the repair of this car. Usually, each owner has such literature. It just has a clear and detailed instruction, which even a beginner can easily understand.
What do you need to know?
First of all, I want to focus on one point. In order to replace the heat exchanger, you do not need to remove the panel in the cabin. All repairs take place exclusively under the hood. Now about the main thing. VAZ 2110 radiators can be:
- old-style, issued before September 2003;
- new designs produced after the specified period.

Be sure to consider this point, since the replacement procedure in both cases will be different. Also, this information will be useful to you when buying a heat exchanger. Before starting work, it is necessary to prepare all the materials and tools that will be required for replacement. What do you need:
- clamps in the amount of at least 4 pieces;
- sacral screwdriver;
- tweezers;
- quality radiator.
Before replacing, it is necessary to drain the antifreeze. There are two options here:
- Drain the antifreeze from the engine block. To do this, unscrew the cap of the expansion tank. As a result, the pressure will drop. Next, unscrew the drain plug. It is located behind the ignition block. Substitute a bucket and collect antifreeze. The total volume should be approximately four liters.
- You can drain the antifreeze using only the expansion tank. In this case, disconnect the hose at the stove. The volume of the drained liquid is usually equal to one liter.
old pattern
Now, the most important thing. We are starting to replace the old-style VAZ 2110 stove radiator. It is important to follow all the steps exactly and not to rush. Here is a detailed list of your actions.
- Remove the rubber seal and windshield.
- Loosen the cover screw. It is located under the master brake cylinder.
- Loosen the four screws on the top of the trim.
- Disconnect two collars from an overlay by which hoses and wires are fixed.
- Disconnect the positive terminal and the negative wire of the fan from the body.
- Remove the two screws located on the left side of the cover. Move it forward a little. You don't need to remove the cover completely.
- Remove the windshield trim by unscrewing the two nuts and five screws.
- Remove the steam outlet hose from the expansion tank.
- Disconnect the hose from the windshield washer. Next, unscrew the four screws.
- After removing the wipers, remove the trim from the windshield.
- Remove the heatsink and fan housing clamps.
- Unscrew front case fan.
- Also unscrew and remove the cabin filter housing screws.
- You can then remove the rear fan housing.
- Now loosen the clamps.
- Disconnect the supply hoses and the damaged radiator.
- After repair, we collect all the elements in the reverse order.
New pattern
When replacing the radiator of the VAZ 2110 stove of a new sample, it must be borne in mind that it is attached to the car body using:
- a screw located in the middle of the end of the windshield in its lower part;
- two nuts located above the exhaust manifold;
- one nut, which is located on the left near the filter.
The new sample heat exchanger consists of two main blocks. Before installation, they must be separated by removing the left and right parts. After removing the right side, disconnect the steam outlet hose. In turn, the right side also consists of two blocks. They are connected to each other with brackets. If you remove them, then you will separate the parts and gain access to the damper. I recommend replacing it with a new one. This completes all the work. 
There is nothing too complicated in replacing a radiator. It is enough to strictly adhere to the order of actions and not to rush. The whole process of disassembly and assembly when replacing the radiator of the VAZ 2110 stove can be seen in the photos and videos that I posted on this page. Do-it-yourself repair will help you not only save money, but also better understand the technical aspects of your iron "friend". 
With age, domestic cars will require more care and attention. It’s good that I realized this in time, because I would have to leave as much money at the car service as the car itself costs. And this, as you know, is not profitable at all.
I am a fan of domestic cars and I try to keep the state of my iron pet for a long time. While it turns out, plus accumulated experience in the repair. If you have any questions, you can contact me through the comments and I will answer as soon as possible. I want to find like-minded people, so do not forget to ask questions.
How is it performed and when is it necessary to remove and replace the radiator of the VAZ 2110 stove? After the winter period passes, many motorists start having problems with cars, and the owners of the model in question are no exception. What to do if the VAZ 2110 stove does not work? Most likely, the heater core needs to be replaced. The reason for the repair may be that there are streaks of antifreeze (antifreeze), which flows out of the radiator due to the expansion of the pipes.
Another signal for repair may be the smell of antifreeze in the cabin or steam in the airflow holes. If you think that the replacement can be carried out in the passenger compartment, then you are deeply mistaken. Repair of the stove involves work under the hood. For this procedure you will need:
- good quality radiator;
- clamps, at least four pieces;
- tweezers;
- screwdriver, preferably a short Phillips screwdriver.
In the automotive market, you can find two types of radiators for the tenth car model: old and new. The old model of the radiator is considered to be the one that was released before 2003, and the new one, respectively, later. Installation of a new model of a heater radiator will not cost much labor, but if you old pattern devices, you have to tinker a little.
Removing and replacing the heater
In order to replace the radiator or repair the VAZ heater, it is necessary to drain the antifreeze from the engine block. Then remove the rubber seal and the pad itself. Find the main brake cylinder and under it unscrew the mount. Next, you will need to disconnect the two clamps that are attached to the wires and hoses.
It is necessary to disconnect the negative wire of the fan and the positive terminals. All these actions are carried out in the back of the car. Find two screws on the left side of the jabot and unscrew. If you did everything right, then the frill should move forward a little. Then you need to move on to removing the windshield lining.
They find a sensor that shows the level of the coolant, and disconnect the terminals from it. After this is done, you need to remove the steam outlet hose. Now you will see a hose with which the windshield is washed, it must also be removed. You will need to remove the windshield wipers. Do not forget to remove the clips of the heater and fan housings.
Together with the fan, the cabin filter housing is removed. If necessary, you can immediately replace the filter. Remove the last and rear parts of the heater fan housing. For more safe work you must loosen the clamps and remove the antifreeze supply hoses. Now you can start repairing the heater radiator, for this they clean it and restore tightness.
Of course, if the stove does not work, you can not repair the old radiator, but simply replace it with a new one. If you want to do everything yourself, then, as professionals emphasize, the time spent on disassembling / assembling parts will be about seven hours.
If you decide to do the replacement yourself, you will save a decent amount of money. But you need to remember that this process is quite laborious. You can not only replace the radiator, but also perform other work. For example, it is recommended to replace the damper of the VAZ 2110 heater, the heater tap, or you can also replace the thermostat.
After the VAZ stove radiator has been replaced, you need to check the operation of the unit. If after all your efforts it does not heat up, then perhaps the reason is an air lock that has formed in the cooling system. If you started the car and the stove started working, then the air flows should be much hotter than before the repair.
Stove heaters of the old and new models were installed on cars. A new type of heater was installed in September 2003. The procedure for replacing the stove radiator of the old and new models is slightly different, but for none of them remove dashboard no need.
How to replace an old-style heater radiator VAZ 2110
1. Before proceeding with the replacement of the stove radiator, you need to drain the coolant.2. Remove the rubber seal located on the windshield. 3. Unscrew the fasteners and remove the jabot.4. Unscrew the screws and nuts on the edges of the windshield and remove it.
  5. Remove and set aside the windshield washer hose so that it does not interfere with the process.6. Loosen the windshield wipers, remove the windshield cover. After that, access to the body of the stove will appear.7. Remove the metal clips from the case. If they are rusty, when installing a new heater core, you will need to install new clips.
  8. Remove the cabin filter, the screws of which are located on the stove body.9. Turn off the heater fan by disconnecting the positive connector and removing the negative terminal.
  10. Unscrew 3 more screws located on the back side of the edge of the top case cover.
  11. Having gained access to the stove radiator, loosen the hose clamps and remove the radiator. Assembly is carried out in the reverse order. Particular care must be taken to check for the heater housing to fall into place, otherwise the stove simply will not heat up due to problems with the damper. Along with the stove radiator, it is recommended to replace the cabin filter.
 How to replace a new heater radiator VAZ 2110, 2111 or 2112
1. Just as when replacing an old-style radiator, it is necessary to drain the coolant and free access to the heater (remove the frill, noise insulation, wipers along with the leashes and the sealing gum on the frill. 2. Remove the two hoses going to the heater radiator (attached clamps), as well as a steam outlet hose that goes to the expansion tank. 3. Disconnect two connectors near the heater fan.4. Disconnect the wires from the gearmotor, unscrew 3 self-tapping screws and dismantle the gearmotor.5. Find 4 attachment points of the heater to the body, unscrew the screws.6. Unscrew 4 more screws that secure the cover to the heater, remove the filter so that it does not interfere with the replacement of the radiator.
  7. Two parts of the heater are fastened with 3 self-tapping screws - they must be unscrewed. In addition, it is necessary to unscrew the large self-tapping screw, which is visible through the air supply hose (L-shaped).
  8. Divide the heater into two parts: first take out the left part, then the right part.
  9. Separate the brackets connecting the right side of the heater.
  10. After that, you can remove the damper and replace it with a new one.11. Wipe or wash all parts to remove traces of dirt and grease, assemble the heater in reverse order.