Classic "eight"
The domestic car VAZ 2108 has come with us a long and difficult path, becoming a silent witness to numerous vital, political, social collapses and fractures. The G8 has been around since the 1980s, when the country was slowly embarking on a new path, still so vague and alluring.
Of course, like any car, VAZ sometimes fails. One of the most common car problems is a steering rack failure. What is driving without a steering wheel? Let's take a look at what features steering G8, for what reasons it breaks and how the VAZ 2108 steering rack is repaired.
Where do problems start
Today, like many years ago, the VAZ 2108 is quite popular, even though the new time has opened the way for numerous interesting import projects. Among the advantages that keep the model afloat are reliability, durability and low price compared to foreign cars. On such a car it is not scary to go to the outback, which is by no means famous for its good roads, and it is not a shame to appear in the country or in the city.

Most often in the "eight" running gear fails
When the car is in good condition, and the traction is good, and the dynamics are not satisfactory, then you enjoy the ride, the speed. But the time of testing comes, and the machine begins to remind you that material things are not eternal. And this is always an unpleasant discovery.
Domestic cars break down more often than foreign cars, the reason lies both in the design technology and in the quality of parts. Our always try to save on everything, even where it is impossible. Speaking about the malfunctions of the well-known G8, it is worth remembering such a mechanism as the steering rack, since it is she who breaks down quite often.
At first, the problem is not too noticeable, only on difficult sections of the road the steering wheel starts to beat, as if frightened by the problems that await the car on the bumpy roads of endless Russia. But soon he begins to pound almost constantly, which makes the driver feel like an asphalt driller. After such a trip, it is not easy to put your nerves in order and not shake yourself. In addition, a knock is often heard. These two symptoms signal one thing: the steering rack has passed.
There are two ways before us: either go to the nearest auto shop and look for a replacement for the mechanism, or repair the steering rack. The latter option is considered the most optimal, economical, but requiring a responsible approach.
Causes of rail failure
Before you start repairing the steering rack, let's find out what actions the car owner leads to its inevitable wear. Firstly, it is a dashing ride on bumpy, pitted and bumpy roads. Having met with such a problem track, do not drive at full sail, slow down better, and then pick up speed. If you give up on the complexity of the road surface, then in the near future from the steering rack, as well as from the rest of the equipment, there will be absolutely nothing left.

Here is the car part
The second reason lies in the defects of the anthers. Their condition should be regularly checked, since even a small crack can lead to bad consequences: in steering rack dust, dirt and even moisture will get in, which is a disaster for any device. Contamination leads to wear of seals and leakage. As a result, the need to replace or urgently repair the steering rack.
The third reason for the problem with the steering wheel is the negligence of the owner of the car. Sometimes car owners leave the car in the cold, and even with the wheels turned out. The steering rack, like other mechanisms, does not withstand such strength tests.
Change the hydraulic fluid in the power steering mechanism in time; forgetfulness in this matter leads to irreversible consequences.
Steering repair

Suspension repair in progress
Management of the VAZ 2108 is a complicated thing, but understandable, so it is quite possible to repair the malfunctions that have arisen on your own. Most often, parts such as the stem, seals and slider wear out, because the whole operation of the system rests on them. If you heard a treacherous knock and rattle in the suspension, then most likely the ball joints (rods) have become unusable. You will have to go to the auto shop or the market to buy this part.
Today, the car market pleases with an abundance of goods. You can choose from original design rods that guarantee increased steering stiffness, reliability and durability. Others are willing to experiment with cheaper pulls, which are not as bad, but much easier. Prices vary depending on the model. For example, traction is inexpensive for Japanese cars, while for a Mercedes it will cost a pretty penny. But in the Soviet "eight" everything is economical, so you won't have to spend much.
Often the bearing mounts are weakened, which causes knocking. Other damage may also occur. To understand this bouquet of problems, it is necessary to dismantle the steering mechanism and subject it to a thorough check.
Steering rack 2108 is repaired as follows. To make it more convenient, we install some stops under the wheels. For every fireman, we put the car on the handbrake. We unscrew all the nuts of the rods and with a key of 13 we dismantle the steering. Let's protect ourselves: we disconnect the battery so as not to inadvertently collide with the positive wire. We dismantle the clamps and unscrew the left shaft, which is located near the floor.
Now it's not easy: you need to disconnect the rail. The whole difficulty lies in the fact that the gear parts, as a rule, do not want to disconnect. So you'll have to fiddle around. Having disconnected the rail, we clean it with a metal brush and wipe it with white spirit.
The next, no less important step is to check the condition of the silent blocks. If you suddenly notice any defects or play, the parts must definitely be replaced. We continue to dismantle the remaining components, which are thoroughly washed and dried.
Definitely need to do some traction. The part must not contain damage, if any, the thrust changes. We examine the hinges. After checking everything, identifying flaws and picking up new parts, we carry out the installation in the reverse order carefully, slowly, carefully. At the end of the work, you need to make sure that they gave the desired result.
Greetings, friends! When I sat behind the wheel of my vehicle for the first time, the first thought that flashed through my head was that this car was assembled from 10, and in winter it will have 4 tracks ((because I hold the steering wheel in my hands and the car goes to the side , I taxi and lo and behold - she goes herself in the other direction, somehow reaching the house, and this is no less than 90 km from the place of purchase immediately to the service station, they tightened the rail and it became tolerable to drive. The rail repair / or replacement was postponed indefinitely because naturally the car broke down and it was simply necessary So I drove off from the beginning of summer to these days…
I thought about replacing the rail, I wanted to immediately install a new one. I consulted with my friends: opinions were divided - someone said that repairs are a waste of money, and someone said that even new rails are noisy now ... Thinking that I will always have time to buy a new rail, I decided to remove it and do troubleshooting old rack (having bought a repair kit just in case). I drove the car into the garage and proceeded to disassemble it, because my work takes me a lot of time, I took off the rail slowly, During disassembly, it was not without surprises that I broke off both studs for fastening the rail from the side of the left pillar (I don’t wish this on anyone). I decided to deal with the rail first and then puzzle over the studs
So let's get started
repair kit
drive shaft and bearing

To knock out a small bearing from the housing, I made a small hole in the housing behind the bearing and knocked out a plastic sleeve with a nail

Inserted plastic bushing

He hammered in abundantly with lithol, pulled on a new cover, secured it with ties

The moment has come to think about what to do with broken hairpins
Cut off the top stud with a chisel


Drilled a hole for the bolt

The wall is double, I drilled it with a screwdriver (first the 4th, then the 8th), I inserted the bolt from the side of the passenger compartment - as it was). It remains to decide whether to cut off the stub of the lower stud or not. reliable - I didn’t want to take risks, the steering was like nothing. I can’t aim the drill at the center of the bolt, but there’s no way to pierce, but with grief I drilled it in half
It was planned to grab it from the salon by welding at the service station, but when the carpet was removed, a surprise was waiting. The car hinted that he was still 17 years old

But there is nothing impossible, in this place there will be a curly patch and the bolts will be welded to it.
It was hard to shove the rack drive into the steering column clamp alone, but DADDY came to the rescue =)
So the car is assembled, it’s dark outside, with trembling hands I try to turn the steering wheel (expecting an amazing result of the work), BUT figs to you - there is a nasty rattle in the rail, although when I assembled everything it was spinning easily, i.e. without load. the drive slips and does not catch the shaft with teeth ... after thinking, I remembered that I need to tighten the octagon nut from below and everything should work. I take a pre-purchased super key
On the VAZ 2108, repairing the steering rack causes a lot of trouble for its owner. It all starts with the discomfort that the owner feels while driving.
After this flying through the stations, where you will find problems that you did not even know about, or maybe not at all. This work can be done with your own hands and without resorting to outside help.
What will be discussed in this article.
When the rail fails
In order to make repairs in time, it is necessary to identify malfunctions at the initial stage, which can lead to irreparable consequences. And make the job easier.
After all, if the mechanism is faulty, then the further, the more the parts that interact with it become unusable.
We identify the problem
To determine the malfunction, you need to know how they manifest themselves. This can be seen in a number of symptoms.
So:
- When, while driving, you hear a knock, which comes, as a rule, from the right side;
- There is an increase in steering play. The driver can immediately feel this by wobbling at speed, and they are not so well controlled.
And upon arrival at the station, it turns out that wheel alignment is also poorly done; - When you eat, you feel difficult to control, and the steering wheel is tight. It's like he's being bitten. This is also a signal to check the rail;
All of the above nuances serve as a reason for inspection and adjustment. It will likely require a complete replacement.
Mechanism device
Before making repairs, you need to know the device and the principle of operation of the mechanism. Otherwise, nothing may work.
From the domestic classics, the VAZ 2108 is distinguished by a simpler and more reliable steering system.
Let's see what the steering rack consists of:
- It fits in the closed crankcase of the entire steering mechanism;
- There is a steering gear, which is connected by an elastic coupling to the steering shaft;
- The movement of the rack to the steering rods is transmitted by a connecting plate;
- Staples for fastening.
These are the main parts of the whole mechanism. There are about forty of them in total. But the main ones you should know.
The operation of this node is quite simple. The rotation of the steering wheel transmits the force to the gear, which is carried out through an elastic coupling and shaft.
In turn, the gear moves the rack with the help of a gear connection. The wheel hubs are rotated with the help of steering rods on a swivel joint.
Troubleshooting options
Before doing the work, you should also know how to troubleshoot.
There are several of them:
- Correction by adjustment, which allows you to get rid of the backlash and will help restore the mechanism to work for a certain period of time;
- Buy a repair kit and replace. This should be done when the shaft is badly worn and a simple adjustment cannot help deal with it;
- Complete replacement of the assembly, which is done, as a rule, when the integrity of the entire body is violated.
Rail repair
In the VAZ 2108 repair, the steering rack can be made on its own. To do this, you must first prepare the tool and the right materials required during operation.
Tools and materials
Some things can be in the garage, but some things will come in handy and buy in addition:
- Clamps plastic 200/4;
- To wipe the parts, we need white spirit;
- Bearings will require grease to lubricate;
- Rags, just do not take with a pile. It can only do harm at work;
- What is the popular name for WD-shka. This howling in some cases is an indispensable liquid that will help remove parts damaged by corrosion and scale;
- Also buy a jar of Movili.
Now let's go through the tool.
Perhaps every car enthusiast has such a set:
- Face heads in a set;
- A handle that extends the heads, preferably with a ratchet;
- Not everyone has it, but it is necessary, this is a puller that will allow you to remove the tips;
- You will need a special wrench for the bearing nuts, it is made in the form of an octahedron.
Attention: Before starting work, all connections should be treated with WD fluid. It is necessary to shed a couple of times an hour after processing the first. After that, you can not be afraid that the nuts will not be unscrewed.
Repair Rules
When everything is prepared, material and tools are purchased, you can get to work. The most important thing here is not to rush, to do everything consciously and accurately.

- To begin with, we install stops under the wheels. Raise and fix the hand brake;
- We block the steering wheel. We de-energize the battery;
- Jack up the car and remove the wheels. But for this option it is better to just put the car on supports. If of course there is an opportunity;
- We loosen and unscrew the nuts of the tips, pull out the fingers from the levers of the racks. In this case, we need a puller.
We apply it and tighten the screw until it stops, then we beat the lever with a hammer. We do it moderately, we do not need to break, we should fix it.
When we strike, we hold the puller screw with the key;

- Loosen the clamp nuts. We disconnected the battery so as not to get on the positive wire;
- There is a bolt in the cabin that holds the left shaft, unscrew it as well. It is near the floor;
- We pull the rail towards ourselves, and at the same time mix it, make oscillatory movements. The thing is. that it will be difficult to separate the gear shank.
But you have to be patient and do it. After disconnection, the rail is freely pulled out through the right hole; - We clamp the element in a vice and clean it with a brush for metal. After that, we moisten the rags in white spirit and wipe;
- After completely cleaning the surface, unscrew the bolts that secure the "mustache". Now we can check the state of the silent blocks.
We immediately look for the presence of mechanical damage and play. If it is, then they need to be replaced; - We remove the mustache, for this we bend the plate with a chisel and completely unscrew the bolts;
- We remove the tongues from the ends of the rail, remove the cover. We remove the rubber bands from the shaft. The cover will definitely have to be thrown away, this is not a part that is used twice.
The rest of the parts are thoroughly washed and dried, do not put them in the sun; - Remove the bearing retainer with a screwdriver. To remove the nut, you need to use a special wrench;
- We put gaskets on the jaws of the yews and clamp the splined shaft. Not hard, but gently tap with a hammer and remove the bearing, then the shaft and gears;

- Again, wash all the removed parts in white spirit. The native bearing is not standard and is quite difficult to purchase, so I also wash it.
It rarely fails, so we remove it carefully; - We take out the gear rack from the housing, release the clamping nut. We wash it, dry it;
- We take out the plastic insert through the slot. It is quite difficult to remove, but do not worry, you can find a replacement in the repair kit.
We take out the emphasis and replace the sealing ring; - Now we examine the mustache. The type of tips should be normal, without external damage.
Please note that the movement must be performed without play. If it is, then it should be replaced.
When carrying out which the length of the lever should be observed. Promote the thread, this will prevent the formation of corrosion; - We inspect the hinges. There should be no mechanical damage in appearance, if any, then replace;
- We put a new plastic sleeve, direct the holes into the body. We make cutting gum;
- From the side of the gear, you need to insert the rack. In this case, the distance from the body to the end should be maintained, it should be about 28 mm. The rail itself cannot protrude;
- Now we need to press in the gear and bearing, and how to do it all the way. To do this, the shaft together with the body must be clamped in a yew. Only it is necessary to press with feeling, and not with all your strength;
- Insert emphasis. Nut. spring;
- It is necessary to insert a new rubber ring from the side of the shaft. This can also be found in the repair kit. We tighten one more nut. We combine the marks and put on the lock washer, cover;
- Now we put on a rubber ring and a cover. Tighten the clamps on the cover;

- We do the installation of the mustache. We put washers on hinges. It is necessary that there is a washer on both sides of the cover;
- We install the plate after that the counter-plate, tighten the bolts tightly. We make a bend of the locking plate. And install rubber plugs.
Now the resulting design is placed in the engine compartment. The instruction is given step by step. Therefore, it is required to carry out all the work in stages and slowly.
- Now, in order to install the rail in place, we need the shaft to get into the hole in the body. We throw on the clamps, put on the washers, bait the nuts;
- For further work, it is better to resort to help, of course. We need to align the ends of the steering shaft (from the passenger compartment), connect and align with the gear shaft.
It is necessary that the coupling bolt hit the right place on the shaft; - As we have made all the details, we need to make the clutch. To do this, you need to tap with a hammer on the surface of the coupling, and gradually feed it deeper.
The correct installation can be signaled by a signal that works. The clutch will work when a signal is heard; - We insert the bolt into the eye of the coupling and clamp it firmly enough;
- Tighten the locknuts on the clamps. Treat the studs with Movil before installation;
- We connect the levers of the racks with the steering tips. We tighten the nuts;
- We connect the battery, fix the brakes and check their operation. We make adjustments to the camber and toe.
For all the work it will take not so much time, about 4-5 hours. The cost of parts will pay off. Everything can be seen on the photo and video of our website.
Attention: If you just need to change the anther, then you can not do this amount of work. To do this, you do not need to remove the entire steering mechanism completely.
Checking and adjusting the work done
When the steering rack has been repaired in the VAZ 2108 and everything is in place, the equipment should also be adjusted.
So:
- When checking, vertical play in the steering rods is not allowed;
- The play must be adjusted on the steering wheel, and correspond to about 15 degrees;
- Steering should be light. There should be no snacking. The number of turns in different directions should be equal;
- After turning the steering wheel, it must return to its original position without assistance;
- The next adjustment should be done after 500-700 km of run. But if problems arise earlier, then you should not delay.

This is where some serious work has been done. But now you are confident in the steering of your car.
Sometimes it can be difficult to remove individual parts, but you should not give up. With new attempts, you are steadily approaching the desired result.
Task: reinforce steering rack VAZ 2108
0:74 1:580
The bulkhead amplifier (UShP), and popularly the steering rack amplifier is used to increase the stiffness of the front panel of the VAZ of the tenth family, Samar and Priory. Reduces the amplitude of movements of the steering rack housing: in the longitudinal direction by 2 times, in the transverse direction - by 5 times. What exactly does such an amplifier change and does it make sense to install it?
2:1712What does the front guard amplifier do?
2:1778There are many manufacturers of yellow iron for cars, from well-known companies to clandestine ones without markings. If at first glance the difference can not be noticed (what differences can there be, a piece of iron is a piece of iron), then during the subsequent installation, "pitfalls" may appear. For example, the mounting holes do not match the regular ones, you have to work somewhere with a file, and somewhere with a mount.
I propose to consider the TechnoMaster bulkhead amplifier, and I do this not for advertising reasons, but because their products have been tested by more than one motorist, and the reviews say that there are no installation problems.
The design of the amplifier was developed jointly with AVTOVAZ specialists and tested in the DTR laboratories. Conclusions from the report:
- The removable bulkhead reinforcement reduces the deformation of the bulkhead in the area of the crankcase mounting brackets and the movement of the crankcase mounting studs at a steering wheel load of ±40 N*m twice.
- The movement of the crankcase after installing the amplifier is reduced by 2.5 times, and the steering wheel angles are reduced by about 10 degrees.
Explanation: with a load on the steering wheel of ±40 N * m, the steering wheel angles without power steering are 53-54 degrees and 42-45 degrees with power.
In other words, it is designed to increase the stiffness of the bulkhead, reduce the movement of the steering gear housing and, as a result, improve the vehicle's handling.
Despite the rain that has passed after the completion of the “rearrangement” test in the standard configuration of the car, with the installed bulkhead shield amplifier, the speed of this maneuver increased by 3-4 km / h even under such conditions
Why do you need a rack amplifier on a VAZ
If the edges are fixed, then the center is movable, and a rail is just screwed on it. Thus, when the steering wheel is rotated, the steering rack "walks" along with the base. These are small values that the shield amplifier minimizes. The positive effect after installing the amplifier is especially noticeable on the VAZ 2108-12, less on Samara and Priora (the design of the engine shield is different for the Samara family).
As a result, on Idling the steering wheel does not tremble, as before, the control has become more precise, and if you turn the steering wheel in place, the panel will no longer hold together =))
Power steering installation
Anyone can install the bulkhead shield amplifier with their own hands within 1-2 hours. To do this, you need 13mm wrenches and two 17mm wrenches. Note that the left and right stirrups are mirror-symmetrical.
Remove the left

TURNING OFF INTO THE TOP NUT
3:54![]()
REMOVING THE LOWER NUT
4:609(in the direction of the vehicle) clamp. Install the left collar of the amplifier with the lug of the cross member up on the studs.
4:812
FROM THE LEFT SIDE
5:1349Tighten nuts.
There is one point or a way to say so as not to remove the steering rack rod. NECESSARY! Catch the moment. Then you can easily remove and install the steering rack clamp

THIS IS THE MOMENT!
6:41
THIS IS THE MOMENT!
7:588
THIS IS THE POSITION THE WHEEL MUST BE IN TO REMOVE THE BRACKET FROM THE STEERING RACK ON THE LEFT SIDE
8:1260Replace right clamp.
8:1305
ON THE RIGHT SIDE
9:1844On top of it, put the rack eyes on the studs. . Tighten all nuts.
Install the cross member. The cross member is inserted from the left side, the rod goes through the steering eye. Insert bolts with spring washers and screw them into the crossbar.

TIGHTEN THE BOLTS WITH A 17MM WRENCH
10:564Tighten both bolts at the same time.
10:634
INSTALLED IN THE SITE
11:1179If the clamps are reversed, a gap of 10 mm will appear in the structure between the cross member and the clamp eyes. Swap clamps.
Whether or not to install a bulkhead amplifier is a personal matter for everyone! Most of those who installed this amplifier noticed the "arrival" and do not regret the money and time spent on installation. However, there are those who did not notice the difference at all and consider these products useless. To get a greater effect, some advise installing a strut strut along with this. It is worth noting that the rack amplifier is certified and will not affect the passage technical inspection 
Result: work to strengthen the steering rack on VAZ 2108 completed.
12:124https://www.drive2.ru/l/546638/
12:159 23256We will assemble after the steering rack of VAZ 2108, 2109, 21099 cars. Along the way, we will replace worn parts with new ones.
Steering rack assembly procedure 2108
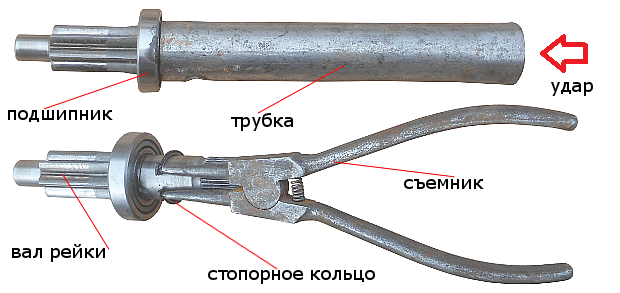
- We install the needle bearing of the rack shaft (if it was removed).
The easiest way to do this is with a piece of pipe of a suitable diameter. Through it with a hammer, hammer the bearing into its seat in the steering gear housing.

- We install a new support sleeve of the rail into the housing.
With its protrusions, the sleeve should fit into the grooves inside the housing. After installation, we cut the damping rings on the bushing and remove the cut pieces. Lubricate the bushing with grease (Fiol-1).

- We install the rail inside the case.
We also lubricate it before installation.
- We assemble the rack shaft.
We press the bearing onto it using a tube of a suitable diameter. We fix the bearing with a retaining ring.
- We install the shaft with the bearing in the steering rack housing.
Before installation, we lay in the rail housing, in the hole for the shaft with the bearing and in the needle bearing, a little grease (20-30 gr). You can lightly tap the shaft from above so that its end enters the hole in the needle bearing that we installed earlier in the rack housing.
- Install and tighten the bearing nut.
We first insert a sealing rubber ring and a plastic protective washer into the nut. We wrap the nut with a special wrench until it stops. On top of the nut, we insert a spring lock washer and a rubber boot with a ring into the body.

- Install the steering rack stop.
Before installation, all parts and the hole in the housing are generously lubricated with grease. First, the stop itself is inserted into the rail body, then the retaining ring, then the stop spring (into the hole in the stop) and all this is tightened with the stop nut using a special key (see photo at the beginning of the article).
The nut is tightened to failure but without effort (torque 1.12 - 1.37 kgf.m), and then released by the value of two divisions marked on the nut (thus, a thermal gap of 0.12 mm is set between the rail and the stop). If necessary (the presence of rack knocks in the body), it is recommended to adjust the tightening of the stop nut on the rack installed on the car.