Greetings dear car owners. I suggest watching a video instruction on the topic Replacement jet thrust VAZ 2107. Read carefully the instructions for the video.
Instructions: Replacing jet rods VAZ 2107 In jet traction, the weakest thing is of course rubber bushings. Replacing the VAZ tie rod bushings as a step in the procedure Replacing the tie rods. How to cope with such a task, you can see in the video on a specific example of a VAZ 2107 car.
To change the rods or their bushings, you will need an inspection hole and a set of keys. The procedure itself is pretty normal. No need to jack up the car, but only have open access under the car. On all the classics, whether on the VAZ 2107 or on the VAZ 2101 or 2106, the replacement of jet rods is similar. It will be necessary to immediately unscrew the lower mount of the shock absorber, and then unscrew the fixing bolts of the thrust. After it is dismantled, you can proceed to either replacing the bushing or replacing the jet thrust completely, everything depends on the situation. Good luck on the road and all the best.
Video lesson Replacing jet rods VAZ 2107
Good afternoon, dear visitors of the site site. In this article I will tell and show how to make the replacement of the bushings of the VAZ 2107 jet rods myself. The principle of replacement is the same for all Classic VAZ models.
In the last article "Replacing jet rods of VAZ cars", I showed how the rods change completely, but if only the rubber bushing (silent block) is worn out, then it makes sense to replace only it.
To begin with, we need to diagnose and find out whether bushings need to be changed on all jet rods. How to correctly diagnose the anterior and rear suspension(running), I recommend that you read a special article (Later I will put a link).
To do this operation, we need a viewing hole. It's good that I have it. Before, when she wasn’t there, I kept running to my neighbors to let them dig deeper into my car, but now everything is much simpler.
Having rolled the car into the inspection hole, I determined that the rubber bushings on the transverse link had worn out. Now let's get started.
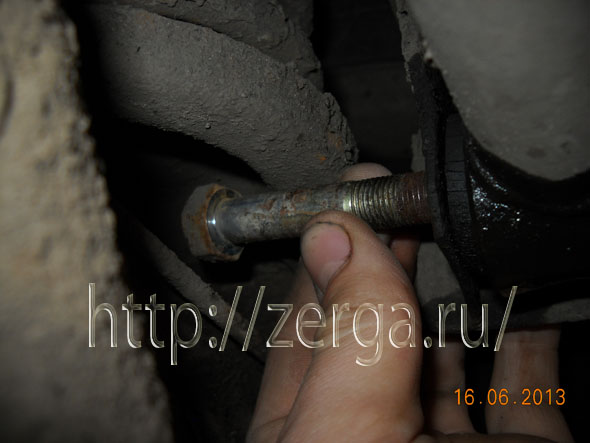
The first thing to do is to remove the transverse jet thrust. I took a metal brush and thoroughly cleaned all the threads on the bolts from dirt and treated with WD-40.
Now that we have everything ready, I unscrewed both nuts without much difficulty.
We faced the next test, this is to pull out the bolts. Why test? Because if the gum is loose, then moisture gets between the bolt and the metal sleeve and corrosion begins. All this leads to the fact that under the influence of corrosion the bolt sticks to the sleeve and sometimes it is simply not possible to pull out the ego.
In my case, I was very lucky and the bolts went very easily. The left bolt came out perfectly, but the right one rested on the lower spring cup.

The photo above shows where the bolt rested. To pull out the bolt, you need to load some scrap metal into the trunk or ask a friend to press down the rear of the car a little. Thus, the bracket will go down a little and the bolt can be pulled out freely.
Now we just extract the thrust, there should be no difficulties here. If the jet thrust will go tight, then you can help her with a mount.

Replacing the rubber bushings jet rods.
To pull out the rubber bushing, we need to knock out the metal inner clip (sleeve). After rummaging through my toolbox, I found the right tool. I don't know what it is, but it just fit. In my opinion, this is a tool for punching holes in the wall, such as an ancient perforator :).


A few more blows and the sleeve flew out along with the tip. Here, be careful not to hit your fingers with a hammer when the bushing comes out sharply.
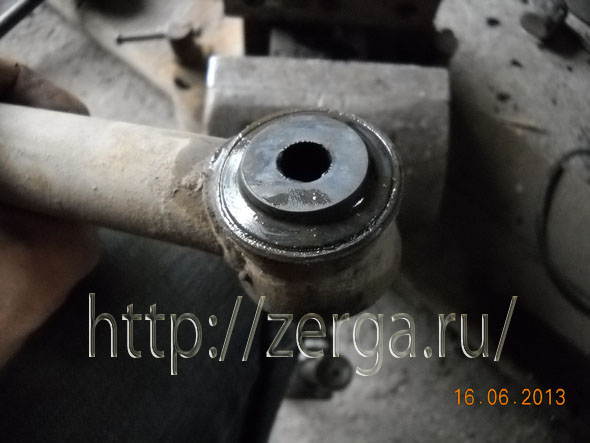
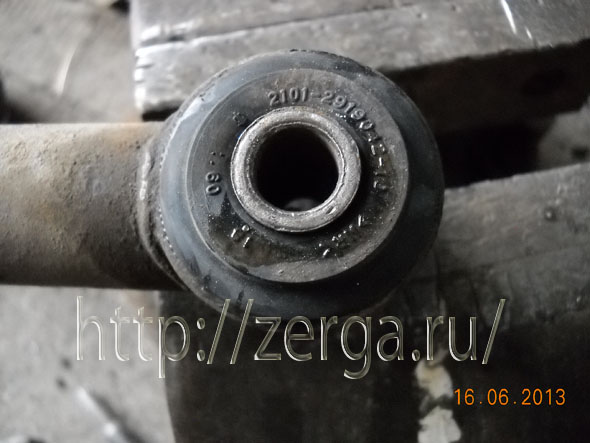
After all the efforts, this is the picture.

The photo above shows how the rubber bushings cracked and this is not much wear. With more wear, the inner metal clip itself falls out and the rubber band too.
The next step is to squeeze out the old gum. We need a rod for extrusion and an emphasis for jet thrust.
I was too lazy to make a special puller and, after rummaging in the garage, I found a suitable tool.

Instead of a thrust bushing, I used a holder for large dies (with which threads are cut), and for extrusion, I used an ordinary metal round log with a diameter of 25 mm.
The photo above shows how I installed this design. With a little effort, the sleeve will easily squeeze out.

The photo above shows how the sleeve began to come out.
With a little more effort, she popped out.

Preparing for the installation of bushings jet rods.
Before you install a new bushing, be sure to clean out all the dirt and rust inside the metal cage of the jet thrust. If this is not done, then when pressing in, a new sleeve can be wrapped and damaged, which we do not need in any way. Yes, and the installation of the sleeve itself will be problematic.
The inner bushings are also subject to wear and see if they are badly worn, then feel free to change them to new ones.
If it is still suitable for further use, then be sure to chamfer the edges.

This is necessary so that when we press in the metal bushings, they do not damage the rubber bushing. Why I say this, because there were cases when I had to change new rubber bushings because of their damage.
I bought new rubber bushings in advance. I did not seek to buy expensive and branded bushings, because ordinary ones go for quite a long time. Of course, you can buy expensive self-stabilizing ones, but I took simple ones.

We proceed to the installation of bushings jet thrust VAZ 2107.
In order for the bushing to easily enter the jet thrust cage, it must be lubricated with soap. Then we install the bushing and jet thrust, as shown in the photo below.

Under the influence of a vice, the sleeve will enter into place. When squeezed, the elastic will begin to bend in one direction and it would seem that she does not want to enter, but you do not pay attention and squeeze further, she simply has no chance and she will eventually enter. The main thing in this case is to quickly squeeze the vise.

After the work done above, we got the following result.
And now, the most important task remains. We need to press in the inner metal sleeve.

I made this bullet from an ordinary bolt. I happened to have a lathe, and I just sharpened the bolt head, but you can grind it off with a sharpener.
I don't remember the exact thickness of the bolt, but I think it was 10 millimeters. This bullet is inserted into the sleeve and looks like this.

We lubricate the bullet with soap and then, according to the principle, as before, crush the sleeve with a vise.

Everything calmly falls into place, but since a bullet is installed in a metal sleeve, it will not reach the end, because it will rest against the cheek of the vise.

Now we need a stand in order to annoy the sleeve. I used an inch sleeve, it just fit.
Having put the coupling, we are annoying the bushing.

After all the work done above, this is the result.
If the inner metal clip protrudes slightly from one side, you need to level it with a hammer.
And now we just have to set the traction in its place. Do not forget to lubricate the bolts with nigrol, you never know what quality the rubber bands will turn out to be.
That, perhaps, is all, we have replaced the VAZ 2107 jet thrust bushings.
Until new posts.
During the operation of the car, the parts of the suspension and other systems are subjected to significant loads, which leads to their wear and tear and failure. On the VAZ 2107 model, wear is formed in the tie rod ends, while driving on a bad road, knocks appear. Ignoring them is fraught with the destruction of the assembly and loss of control of the car. The solution to the problem is the replacement of faulty parts of the mechanism.
To perform repair work on a VAZ 2107 car, the following spare parts will be required:
- steering rods;
- protective covers;
- nuts with a crown and a fixing cotter pin.
The replacement of nodes is carried out on a car installed above the inspection pit. To dismantle parts and install new ones, a special puller, socket wrench and extension cord are used.
Repair procedure
Replacing a defective part of the steering mechanism is carried out in the following sequence:
- We clean the assembly from contaminants with a brush, apply a penetrating compound to the threaded connections.
- Using pliers, we take out the fixing cotter pins and, using a spanner wrench or a “22” head, unscrew the nut on the finger.
- Steering rods from the steering knuckle are undocked using a special puller. The device is put on the knot from above and with the help of a bolt the finger is squeezed out of the eye.

Useful advice: if the junction is first tapped through a copper or bronze punch, then the dismantling process is significantly accelerated.

The manufacturer of the VAZ 2107 car recommends changing worn steering rods as a set. The resource of these structural units from the same batch installed on the vehicle, as a rule, is the same. Replacing only one of them does not fundamentally solve the problem, it will take a little time and the repair process will have to be repeated for the remaining elements of the system.
Parts installation and adjustment
Installation of steering rods on a car of the classic model VAZ 2107 is not particularly difficult and is carried out as follows:
- We measure the length of the old assembly using a steel ruler with the greatest possible accuracy.
- We adjust the new assembly using a threaded connection to the desired size and lock it with lock nuts.
- Installing the part in place is carried out by inserting a finger into the seat and screwing the nut with a certain moment.
But very often you have to sweat - the main difficulty in dismantling old rods.
How to remove the old jet thrust VAZ 2107
Very often, not all traction is changed, but only rubber and metal bushings, but these works are a little more difficult - it is easier to change the old traction to a new assembly.
They put the car on a pit or overpass, fix it. They clean the attachment points and the rods themselves from dirt (a regular metal brush plus a rag). Fill all threaded connections with WD-40 and let them “turn off” (sometimes it helps).
You can unscrew the rod from the side of the body using two 19 keys. To facilitate the process, a pipe is sometimes used on a key to increase the lever. Some people use a hammer and chisel to move the nut out of place - it all depends on the situation. But most often the connection sticks tightly and these “rough”, but effective methods are used. Then the bolt is knocked out, the traction is removed along with rubber and metal bushings.
Removing traction from the side of the bridge is more difficult. It is often not possible to unscrew the bolt from the side of the bridge and it has to be cut off with a grinder. Moreover, it is necessary to cut off in two places between the bracket and the silent block. Only after the bolt has been cut can the rod be removed from the bracket, and the remaining bolt head and nut knocked out.
Installation of jet thrust VAZ 2107
The second stage of replacing the VAZ 2107 jet thrust is the installation of a new one. First, rubber bushings lubricated with soapy water are pressed into the lugs of the thrust. Then metal bushings are inserted into them. Insert the rod into the brackets and fasten it with new bolts and nuts. If rubber and metal bushings are lubricated with soapy water, then it is better to treat threaded connections with lithol. Next time, this will make it easier to dismantle the traction.
Features of the control system of the "seven" Having become a classic over the years, the seventh Zhiguli model continues to wind kilometers and delight owners with its reliability and ease of operation. Finding any detail for it will not be difficult even for a complete "teapot". And the technology of restoration work at home has been perfected by generations of motorists.
If you ask experienced drivers what they started with, then every third will say: with a Zhiguli. Yes, there will also be unflattering reviews, but at the same time nostalgia will be noticeable in the eyes - anyone will remember some significant event associated with the “seven”. However, we will not be distracted and consider the experience of maintaining and repairing the control system, namely replacement of steering rods for VAZ 2107.
Mandatory maintenance of system nodes
Front wheel stability is prerequisite affecting vehicle stability. Any violation of the settings or failure of one part invariably turns into a chain reaction, leading to an imbalance in the entire system. That is why the manufacturer provides certain maintenance work which include:
- cleaning from pollution;
- wheel alignment;
- adjustment of the worm mechanism;
- steering wheel free play control;
- drive check.
Purpose and necessary checks of the vehicle control system
The transmission of force to the rotary levers from the steering mechanism is carried out with the help of rods, which are an integral part of the so-called trapezium. This node consists of:
- reducer;
- long rod;
- pendulum lever;
- two long tips;
- two short tips;
- two clamping devices with clamping collars.
 Controllability, comfort and safety of movement depend on the listed details. Therefore, increased attention should be paid to monitoring their condition and not violating the schedule of periodic inspections. Some prefer to trust the masters of the service station, but if you look, then such an operation is quite feasible at home.
To do this, it will be enough to have a viewing hole or overpass. Next, we explore:
- the condition of the rubber anthers;
- axial movement of fingers;
- the presence of cracks;
- hinges for gaps;
- fastening the pendulum to the body.
Next, you need to check the play of the steering wheel. When swinging left and right, no more than 2 cm of free play is allowed. Press the brake pedal and experience the ease of movement of the "steering wheel" - it should rotate relatively easily.
Typical malfunctions requiring the replacement of steering rods on the VAZ 2107 and the sequence of repair work
Such an operation is necessary if during the examination were found:
- extraneous knock;
- increased clearance in ball joints;
- instability of the car in motion;
- stiff steering wheel.
The elimination of these factors requires an immediate solution. In most cases, the problem lies in the tips or rods.
Experts recommend using new parts only from trusted manufacturers and not trying to restore a faulty part.
To perform the dismantling and installation operations, you will need:
- penetrating liquid in a cylinder (WD-40, Hi-Gear);
- wrench and socket wrench 22 mm;
- pliers;
- special puller.
Having previously installed the car on a viewing hole, we proceed to replace the faulty steering rods VAZ 2107 in the following sequence:
- Apply grease from a can to the threads of the ball joints.
- Remove nut cotter pins with pliers.
- Using a 22 mm wrench, unscrew the nut securing the ball joint pin.
- Using a 22 mm socket wrench, unscrew the nuts of the side rod pins from the engine compartment.
- Press out the pins of the tips with a puller and remove the side rods.
- Loosen the clamp bolts and unscrew the tips.
- Detach the trapezoid side members hinges from the pendulum arm.
- Press out the steering pins and dismantle the middle link.
One important point - before removing the side rods, be sure to measure its length so that during assembly it does not violate the toe angle. But, nevertheless, after the completion of work, it is necessary to measure these parameters and, if necessary, adjust them. Installation takes place in the same way, only in reverse order.