burst rear springs on your favorite classics"? With a slight load on the passenger compartment or trunk of the car, did the ground clearance decrease significantly? If yes, then it's time replace rear springs. Interested in the question of how to make a replacement with your own hands? Then boldly, we read this article further and find out how to replace the rear springs on cars VAZ-2101, VAZ-2104, VAZ-2105, VAZ-2106, VAZ-2107 or just to " Classics". First point. What do you need to replace the rear springs. Of course, these are the springs themselves. From the assortment presented on the markets of Kharkov, in particular on the Losk market, it can be advised to purchase springs from the Perm Spring and Spring Plant or as a more expensive version of the Trek spring. In addition to the springs, you need to buy rubber spacers with metal clips. On sale you can find spacers of three types (sizes): standard, medium (40 mm) and high (50 mm).
The article describes the installation standard springs with medium spacers (photo 1), you can also experiment with the option - springs with high spacers, but only if you put simple springs (2101), and not reinforced 2102. Since the springs 2102 are already much higher than the standard ones, then together with high and even medium rubber spacers, they can lift the car very much. As a result, the course of standard VAZ shock absorbers will not be enough, which will entail the replacement of the shock absorbers themselves (for example, with longer Moskvichevsk shock absorbers) or you will have to visit the nearest welder in order for him to weld additional rings onto the shock absorber. But installing the cargo version of the springs on the model VAZ 2101, VAZ 2105, VAZ 2106, VAZ 2107 necessary only in extreme cases, well, perhaps your " penny" or " seven» every day serves you as a little Gazelle.

Now, let's talk about the tool that we need during work. It is necessary to have two jacks (for example, a frog jack paired with a trapezoid jack photo 2), a pair of keys for 19, a wheelbrace and a large screwdriver. It is better to work on the inspection hole, since it will be very inconvenient to replace the springs from the "ground".

The procedure for replacing the rear springs on cars VAZ-2101, VAZ-2104, VAZ-2105, VAZ-2106, VAZ-2107, Classic:
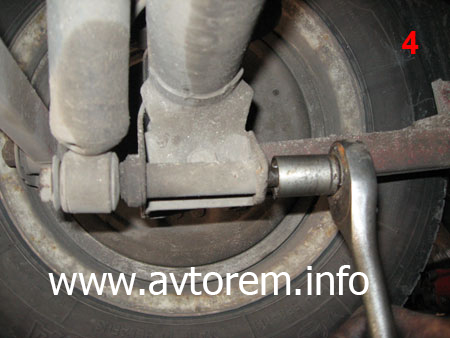
let go wheel bolts(photo 3) and unscrew from below. We take out the lower bolt of the rear shock absorber (photo 4), then unscrew it, and take out the bolt with a short jet thrust(photo 5).

![]()
After that, we raise the car body with a jack, photo 6 (the wheel will remain on the ground, since the shock absorber is taken away), then we install the trapezium jack under the stocking of the rear axle (photo 7) and raise the wheel.


When the wheel is removed, we begin to lower the rear axle with a trapezoid jack, carefully observing the condition of the spring (it will be seen when it weakens and leaves the seat) and the brake hose, since it can be torn (photo 8).

We remove the spring and take out the old spacers or what is left of them. We check the condition of the seats of the rear spring (photo 9a and 9c).


Before installing the springs, it can be advised to tie the rubber spacers to the springs using electrical tape, tape or wire. When installing the spring, we direct its lower end strictly into the recess in the cup on rear axle(photo 10).

When the spring is in place, you can raise the edge of the rear axle with a trapezoid jack and install the wheel. After that, the car can be lowered to the ground and the rear shock absorber and short jet thrust can be fixed.
All! Now we can enjoy the result of our work. In order not to guess whether the car has risen or not, and how much. You can measure the distance between the ground and the fender of the car before starting the replacement with a tape measure (photo 11). And at the end of the work, check how much the readings have changed. In my case: +4 cm.

When using an article or photos, an active direct hyperlink to the site www.!
The shock absorber wears out the sealing ring (gland) located between the rod and the cylinder. In this case, oil flows out, and the part fails. This malfunction is easy - the shock absorber becomes wet. In addition, rubber bushings in the upper and lower mounts wear out in it. Then there are additional knocks when driving on uneven surfaces. Any of these signs - indicates that the rear suspension spring needs to be replaced or the rear suspension shock absorber needs to be replaced.
In order to replace the rear shock absorber on a VAZ, we install the car on a lift or jacks to hang the entire rear part (that is, we jack it up on both sides). We remove the wheel. We install supports under the rear beam so that it does not fall when we unscrew the shock absorber.
Open the trunk and completely free it from things. Remove the plastic cover with a screwdriver. Under it is the upper shock absorber mount. We unscrew the bolts of the upper fastening of the part with a ratchet wrench, with a head No. 17. Or with a ring wrench, wrench No. 6, holding the shock absorber rod from turning.

Now we unscrew the bottom fastening of the part from the beam. To do this, you need two keys number 19. With a ratchet wrench - we unscrew the fastening nut, with an open-end wrench - we hold the bolt from scrolling.

Now we raise the car even higher to free the entire structure. And we take it out. The rear suspension spring also needs to be removed.

We remove the spring, boot and pillow (compression buffer) from the old shock absorber.
We take a new part. We pump it manually several times.

We install the previously removed pillow, boot, sealing ring and spring on the stem of the new shock absorber. If you need to replace one of these parts, now is the time to do it. All of them must be in good order and in their places, otherwise the new shock absorber will fail very quickly.

Thanks for subscribing!
Attention. If the springs are deformed or damaged, they must be changed in pairs, since it is impossible to replace the rear suspension spring separately from the other.

- We insert a bolt of fastening of the shock-absorber to a beam.
- We bait the nut and tighten it.
- We lower the car lower to compress the spring and insert the shock absorber mounting bolts into the holes.
- We clamp the nuts of the upper support and close the hole with a plastic cap.
![]()
On the other hand, the shock absorber can be replaced in the same way.
Shock absorbers are quite reliable and durable mechanisms. operating a car, such as slowing down on a bad road, carefully overcoming speed bumps, you will almost certainly roll back on them for at least the period guaranteed by the manufacturer and at the same time the performance of the car will not deteriorate.
Rear suspension springs need to be replaced when they sag or become damaged. Regardless of the damage found on the spring, you must always replace both springs at the same time and install only the same springs. In addition, the removal of the springs is required when replacing the compression stroke buffer or shock absorber.
To remove the rear springs on the VAZ model, before starting work, put the car on a viewing hole / overpass, where there is good lighting. Put the car on the handbrake and place chocks under the wheels. Switch off the ignition.
Using a wrench 10, unscrew the nut that secures the pressure regulator rods on the rear axle. The bolt must be supported with a suitable wrench. The lower part of the pressure regulator rod must also be disconnected. Using this wrench, unscrew the fasteners of the brake pipe tee. On a high mileage vehicle, lubricate the joint with a penetrating lubricant and remove the tee.
Disconnect the rear shock absorber from the mounting bracket. Then you need to hang the rear wheel to remove the rear spring and plastic gasket. Remove the rubber pad on top of the spring from the support cup. Gaskets should be inspected and, if damaged, replaced with new ones.
To remove the springs on a VAZ front-wheel drive car, install the vehicle on the inspection hole where it needs to be fixed. Next, you need to remove the back of the rear seat and take the upholstery of the wheel niche located at the back to the side. Unscrew the nut with a key 17, which is located on top of the niche. In this case, the shock absorber rod must be held with the key 6.
Remove the nut, support washer, spring washer, and top cushion. Using 2 wrenches 19, unscrew the nut securing the shock absorber to the beam. Remove the shock absorber bolt if necessary using a drift.
Remove shock absorber and spring. Remove the spring from the shock absorber, as well as the compression buffer and bottom cushion. Very often, the gasket from the spring "sticks" on the body. If it has deformations and breaks, it should be replaced with a new one.
To remove the spring on the Prior or Kalina, you need to hang out their back, then remove the rear wheels and lower it until the springs begin to compress. Tilt or remove the rear seatbacks. Lock the rods on the rear shock absorbers and unscrew the 2 nuts securing them to the body.
Next, take spring washers, upper rubber cushions and cushion washers. After that, you need to hang out the back part again to decompress the springs. Release the shock absorber from the suspension arms to remove it as an assembly. From the shock absorber, it is necessary to remove the spring with the gasket, bushing, washer, bottom cushion, casing, and also the compression buffer.
A car suspension spring is the part that, in fact, keeps the entire structure in a perfectly even state. On old cars of the so-called "domestic" car industry, the spring and shock absorber were installed separately from each other, although, in general, they still remained interconnected parts. But on modern cars, the suspension spring is combined with a shock absorber. Therefore, the shock absorber and spring would be more correctly called a telescopic strut.
But both the spring and the spring can wear out over time and give a significant draft to the car body. The most unpleasant thing is when only one side settles, or only the rear suspension springs. Then the car body begins to look very unaesthetic, and the need to replace this part can even be determined visually. We will talk about how to do this without the help of specialists below.
1. How to know that you need to replace the rear suspension spring: all about the part and its operation.
Regardless of whether the spring and shock absorber are combined with each other or not, they always work in pairs. The main tasks that are assigned to them are to ensure maximum controllability of the car while driving, as well as the smoothness of its course. Due to the elasticity of the spring, it allows you to soften the shocks and shocks that are transmitted to the car from road bumps. It happens like this:
1. When hitting a pit or a small hill, the wheel bounces off the ground and, in fact, ceases to be controllable.
2. The spring at the same time helps to return the wheel to its place: due to its elasticity, it absorbs the impact force from the road surface.
 However, the spring alone is not capable of completely absorbing the vibrations. Therefore, a shock absorber comes to the rescue, thanks to which the vibrations of the car body and it are converted into heat. As you know, it is the shock absorbers that often fail, while the spring can serve for a very long time without any interruptions. But if the spring and shock absorber are a single mechanism, a logical question arises: should the spring be changed along with the suspension shock absorber?
To answer this question, let's first deal with the reasons why the spring most often fails:
- the so-called "fatigue" of the metal, which occurs after a fairly long operation of the car and as a result of the natural wear of the suspension spring;
The presence of damage on the surface of the spring, which was caused by its friction against other parts of the car, the ingress of stones into the suspension, or as a result of the complete compression of the spring;
Regular driving on uneven sections of the road, when a very strong load is placed on the spring;
The appearance of foci of metal corrosion, which often occurs due to high humidity or under the influence of salt, which is sprinkled on the road in winter.
But more often than not, it is a faulty shock absorber that causes spring wear. In such a situation, the main load from the suspension and the road is transferred to the spring, which causes its premature wear. For this reason, along with the replacement of the shock absorber, it is recommended to replace the spring. However, due to the high cost of this part, it is not always rational to do this. If a visual inspection of the spring showed that it is in a fairly efficient condition, it can be left.
 But still, it is worth understanding the other side of the coin: if new shock absorbers are installed with old, already slightly worn and rusty springs, this will undoubtedly shorten the life of these very new shock absorbers. In fact, such repairs can be considered only half completed. So, if we make deeper economic calculations, nevertheless, the simultaneous replacement of shock absorbers and springs may turn out to be more profitable.
In any case, it's up to you. We will only voice a few more reasons, in connection with which specialists always replace the spring of the rear suspension of a car (and this also applies to the front suspension):
- if the spring has been broken. This can happen with very strong loads on the suspension and wear of the spring itself. The fracture usually occurs either in the uppermost or lowermost coil;
If the metal has been seriously damaged by external mechanical action or corrosion;
Vehicle subsidence. Usually this fact is quite clearly visible, however, to be convincing, it is recommended to measure the distance from the center of each wheel to its wheel arch and compare the data for each wheel;
When observing the unevenness of the "horizon" of the car - when the rear suspension sags very much compared to the front (or vice versa).
In general, if you could not make such comments with respect to the springs of your car, then you can replace them with every second replacement of shock absorbers.
2. How is the car rear suspension spring replaced?
 When discussing the process of replacing the rear suspension spring, the following feature should be immediately noted: just like shock absorbers, springs must be changed in pairs on the same axle. That is, if the right spring of the rear suspension changes (let's say it burst), then along with it it is imperative to replace the left one. Otherwise, you run the risk of unbalancing your car's suspension, which can occur due to varying states of wear on the springs. In turn, this will undoubtedly affect the handling of the car.
But besides this, do not forget that suspension repair necessarily entails the need for exposure. For this reason, when planning to replace the spring, it is imperative to include this procedure in your to-do list. You can also find a detailed description of how to set the wheel alignment yourself in our blog. As for how the rear suspension spring is replaced, its implementation is impossible without the use of a certain list of tools. In particular, you will need:
1. Scrap or mounting blade.
2. Special ties that allow you to tighten the springs.
3. Standard wrench set.
4. New springs for the rear suspension.
5. Rubber supports for springs (each spring needs a pair of such supports - they are placed both above and below).
3. Car rear suspension spring replacement process: a detailed description of the procedure.
 So, you can start replacing the springs of the rear suspension of the car. However, it is worth mentioning again that if such a procedure is carried out in connection with the subsidence of the rear of the car, then it is better to simultaneously replace the springs and the front suspension. Such an action will allow you to level the "horizon" of the car and bring all suspension parameters as close as possible to the factory ones.
The first thing we have to do when performing the rear suspension spring replacement process is to dismantle the old springs. This must be done as follows:
1. We choose a convenient place for the implementation of this procedure. It is best to jack up the car a little, first on one side, and then on the other. Thanks to this, you will take the load off the suspension, and it will be convenient for you to work with the spring.
2. After that, we crawl under the car and find the place where the rear shock absorber is attached. Usually the attachment point is at the bottom of this element. We twist the nut and take out the fixing bolt.
3. We take the shock absorber a little to the side. So it will not interfere with subsequent manipulations with the rear suspension spring.
4. We insert a crowbar or mounting blade into the spring and raise the car on a jack. After that, we try to remove the lowest coil of the spring from its lower support. To do this, the spring must be moved forward a little. As soon as it comes out of the support, it can be removed very easily.
 5.
To remove the spring, you can also use special ties. It will be much more convenient and safer to work with them, but if you don’t have them in your “farm”, you will have to make do with improvised tools. This is a very big danger, because after removing the spring, it can shoot right at you, which can lead to very unpleasant consequences.
5.
To remove the spring, you can also use special ties. It will be much more convenient and safer to work with them, but if you don’t have them in your “farm”, you will have to make do with improvised tools. This is a very big danger, because after removing the spring, it can shoot right at you, which can lead to very unpleasant consequences.
6. In the process of working with a jack, it is very important to monitor the brake hoses. The fact is that due to lifting the car and removing the spring from the suspension, it can stretch too much. If this happens, you must stop lifting the car and continue removing the spring in the position in which you managed to lift it. If this remark is not taken into account, then you can leave the rear contour of the car without brakes at all, since the hose will simply break.
7. After you repeat this procedure with the second wheel, that is, remove the spring from it, you must also remove the rubber pads from the springs. As we already described above, one gasket should be put on the top of the spring, and the second on the bottom. It even happens that the gaskets are removed with the springs, and therefore they will have to be looked for not on the body, but directly on the springs themselves. Gaskets, in any case, must be replaced with new ones.
 After that, you can safely start installing new springs. This process is carried out in reverse order. It is only worth noting that it is better to install new gaskets on the springs with adhesive tape. Thanks to this, it is possible to fix the gasket as accurately as possible, the shape of which very accurately fulfills the bevel of the spring, so that it does not slip.
In fact, you just have to screw the shock absorber back on and lower the car from. After completing the procedure, it is imperative to once again measure the distance from the center of the wheel to its arch and compare this indicator with the second wheel of the axle. The result obtained must necessarily match on both wheels.
Finally, we also want to remind you that when choosing springs for one axle, you need to make sure that they belong to the same group. We are talking about a special marking of the springs of the automobile suspension, which must be indicated directly on the product itself. Marking is carried out with ordinary paint. If it is green - you have a group B spring in your hands, if it is yellow - group A. These groups indicate how long the springs are:
- group A- length over 273 mm;
- group B– length less than or exactly 273 mm.
 However, if the same springs must necessarily be on the same axle, then springs of different types can be installed on the rear and front suspensions. It is best to install group A springs only on the front, since the weight of the car's engine often significantly shrinks the front of the body. And if you install the springs of group A in front, and the rear of group B, the body will align in a perfectly straight line.
Subscribe to our feeds