Repair crankshaft(crankshaft)
Crankshaft repair or as the people say crankshaft, many of our people try to do themselves. But since homemade people know the general idea of \u200b\u200brepairing a car engine and do not take into account some of the nuances, I will give simple tests for checking the crankshaft.
The first thing you need to pay attention to when visually checking the crankshaft is on the necks and determine whether to grind crankshaft, this can be done without any instruments visually and by touch. You also need to determine whether there is still a place for boring the crankshaft, the easiest way to determine this is by liners.
I’ll explain right away that VAZ crankshafts can be bored 4 times, the repair size of the liners increases by 0.25 mm, the first bore of the crankshaft will be for 0.25 liners, the second bore will be for 0.50 liners, the third bore for 0.75 liners, and the last one for inserts 1.00. GAZ and UAZ crankshafts can be bored up to 6 times and the size of the liners will also increase by 0.25 mm, the first bore of the liners is 0.25, the second bore of the liners is 0.50, the third is 0.75, the fourth is 1.00, the fifth is 1.25, and last 1.50.
Therefore, when the crankshaft was removed from the engine block, immediately look at the size of the liners so that you can determine whether there is still an opportunity for boring the crankshaft. The photo shows the liner and the place where the liner size is applied.
A standard crankshaft (a factory crankshaft that has not yet been bored) will have liners with a badge and no numbers.
Photo. Crankshaft liner, arrow 1 indicates the liner icon and arrow 2 the liner size is 0.25.
To bore the crankshaft or not
Now you need to determine whether it is necessary to bore the crankshaft or not, pay attention to the crankshaft journals, risks and wavy grooves are visible on the necks, slide your finger along the neck, if risks are visible on the neck, grooves and by swiping your finger you will feel the slightest waviness, don’t even think about it, take it to boring crankshaft. But do not immediately buy liners for the crankshaft, after boring, the borer will tell you which liners to buy, as it happens due to the heavy wear of the crankshaft journals, they bore two sizes more.

Photo. Heavily developed neck of the crankshaft of the Volga
It rarely happens that the crankshaft journals look good, pay attention to the main liners and if you see a shiny wear on the liners, this indicates that the crankshaft is weakened and has a large gap, and dangling in the liners stuffs shiny stripes.

Photo. Liners with signs of high crankshaft wear
But do not confuse, also shiny stripes on the liners may appear when installing the crankshaft when twisting the pillow with the liner, when the crankshaft turns out to be clamped and barely scrolls or wedges. In this case, the first grinder made a mistake when grinding the crankshaft, the second one got debris under the liner, so when installing the liners, carefully wipe the beds (the place where the liner is installed is called the bed).
If you just replace the liners without grinding a worn crankshaft, then it's like throwing money away, the effect will be zero. Also, if the engine had very low oil pressure before the repair (the pressure light is on at idle), this already indicates that it is necessary to bore the crankshaft for repair liners.
It is better not to be lazy and take the crankshaft to the bore, and overpay a little money than just replace the liners.
You can't fool iron!
Using these tips you can easily determine without a micrometer whether to grind the crankshaft or not.
How to install crankshaft pillows
Remember this, the crankshaft pillows cannot be interchanged, from which place the pillow was removed there and it must be put in, and the lock on the liner must be placed to the lock of the other liner. And it’s better to do this, before spinning the crankshaft, fill the pillows with a core, the first pillow is one point, the second pillow is two points, etc. I use a set of numbers, but you may not have a set of numbers, then use the core. Also, when you fill the marks on the pillows, fill them so that it is clear to you where the front and where the back of the pillow is, hit the marks closer to the edge of the front of the pillow, then when assembling, if you are distracted, then looking at the put pillow on the marks, you will understand that you were not mistaken. VAZ engine pillows have factory risks on the pillows, they can be left unmarked, but it will not be worse to outline.

Photo. The number 2 stuffed by me on the second pillow, the top of the number looks in front
I had a case, they asked me to look at the engine, they simply replaced the liners on it and did not bore the crankshaft. So the crankshaft turned out to be clamped, it immediately surprised me how a clamped crankshaft can be when they simply replaced the old liners with new ones.
Everything turned out to be very simple, another master suggested to this master that the pillows should not be screwed on the lock to the lock on the liners, but vice versa. I twisted the pillows, as expected, lock to lock, and the crankshaft spun. But looking at this crankshaft, I immediately realized that all their work was in vain, even at a glance it was covered in grooves, I told him that there would be no sense in working. But he decided that everything would be fine.
He did not travel for a long time, as there was no oil pressure in the engine, it did not appear, although he put in new liners.
The crankshaft clamps the shaft on the liners
I bore crankshafts from trusted borers, and I don’t experience any problems when assembling the engine. But if you bored the crankshaft and the borer made a mistake, and the crankshaft is clamped with liners, or vice versa, it is very loose, then there is a problem of installing the crankshaft on the engine.
I’ll tell you how to fix it if the crankshaft is clamped with liners, both on the main journals and on the connecting rods.
But first you need to install the liners correctly in the bed of the engine block, since if the liners are not installed correctly, the engine will jam, the photo shows how the liners should be correctly positioned on the VAZ engine. But on other engines, liners are also installed.

Photo. Shows how to properly install liners in the engine block.
After the liners are installed in the engine block, it is necessary to correctly install and select the thrust half rings or rings (depending on the engine), in short, it is advisable to install or adjust the thrust half rings so that there is no longitudinal movement of the crankshaft.
Now we lay the crankshaft on the liners and insert the liners into the pillows of the block, be sure the pillows must be put in their places and the liner lock must be placed to another liner lock. We lightly bait the pillows, after all the pillows are put in place, we begin to tighten the pillows one at a time, and after the pillow is tightened, be sure to try to rotate the crankshaft.

Photo. View of the foil in front of the lining between the pillows.
If, after tightening the pillow, the crankshaft is clamped and it does not scroll, it is imperative to relax the clamped crankshaft neck. This can be done with a simple chocolate foil, the photo shows how to cut the foil correctly and how to put it in order to open the clamped crankshaft journal. It happens that one lining of the foil is not enough, so put additional foil until the crankshaft starts to turn. This method is suitable for both root pillows and connecting rods. After picking up and tightening the foil, cut off the excess with a knife, the foil is placed on one side of the pillow, where there are no insert locks.

Photo. Shows how to correctly put the foil between the pillows.
Crankshaft is loose
The crankshaft borer can make a mistake and loosen the crankshaft, then the engine will not have good oil pressure, and because of this, the engine can quickly knock.

Photo. So with a key you can turn the crankshaft on the VAZ engine.
You can check for loose crankshaft like this. Tighten the pillow and scroll the crankshaft, if it scrolls very easily, it does not interfere with checking whether the crankshaft is loose or not.
Usually the crankshaft after a good bore is not clamped and scrolls easily. Remove the pillow, pull out the liner and put the chocolate foil under the liner, tighten the liner, if the crankshaft gets stuck or starts to spin noticeably more difficult, then this crankshaft neck is bored perfectly, pull the foil out from under the liner and check the next pillow.

Photo. It is shown how to put the foil under the insert, and be sure to cut off the excess foil with the tip of a knife, it shows that the foil is cut off on one side and not on the other.
If, after the foil was placed under the liner, the crankshaft did not turn more difficult, then this crankshaft neck is weakened, put more foil under this pillow between the liner until the crankshaft starts to turn more difficult. After all the pillows have been checked and found to be loose, and if more than one foil had to be placed under the liner, then the crankshaft will have to be completely removed and under those necks that had to be placed more than one foil, it will be necessary to divide the foil strips into two and put half of the foil under the liner in the block. Install the crankshaft, tighten it, that's all, you have perfectly fitted the liners, and the crankshaft will work perfectly in the engine.
Necessarily in the lined foil under the liner, through the holes in the liner, make a hole with a nail for the passage of oil.
Restoration of crankshafts
You can also use the restoration workshop crankshafts, but I do not advise restoring and giving the crankshaft for welding. Heard a lot of disapproving reviews about rebuilt crankshafts, the first these crankshafts break, the second wear out quickly.

Photo. Broken crankshaft VAZ-2103, crankshaft of the last bore (liner size 1.00)
In the photo you see a broken crankshaft of the last bore, after boring this crankshaft and installing it on the engine, it traveled 45,000 km before failure. True, the owner of this six engine did not spare much and gave him gas.
Therefore, if your car has a crankshaft of the last bore, then do not drive, driving such a car should be calm.
Do I need to balance the crankshaft after it has been bored?
No, the crankshaft does not need to be balanced after boring. Feel free to put a bored crankshaft and ride, everything will be fine.
Does crankshaft boring grind all journals or not?
When boring the crankshaft, the boring master measures the crankshaft and can only machine the main journals and not touch the connecting rods, or vice versa. But for me, if I give the crankshaft for grinding, then I ask you to grind the crankshaft completely, it’s so calm for me.
How to wash the crankshaft after boring?
It is very easy to wash the crankshaft after boring, fill the pump with gasoline, and press the hose from the pump to the crankshaft holes, press on the pump and gasoline under pressure will flush the crankshaft inside. Usually, the holes on the crankshaft journals are through, so plug the opposite hole with your finger, and gasoline will go through the channel into the crankpin and flush the entire channel.
But do not wash with diesel fuel, as it is very tart, and when assembling the crankshaft, the remains of diesel fuel will come out of the crankshaft holes onto the liners and it may jam.
What to do if the crankshaft plugs fell into the crankshaft?
Once the crankshaft plugs have fallen into the crankshaft, they must be drilled by inserting a drill into this hole, and it is advisable to select a drill with the diameter of the hole. And most likely you tried to knock out the plugs on the advice of the crankshaft borer.
Somehow I bored the crankshaft and the borer tells me, now I need to knock out the plugs, clean the channel and hammer in new ones. I tell him, I will now bring you new plugs, knock them out and clean them, and hammer in new ones so that you can give a one hundred percent guarantee that the plugs you clogged will not fall out under oil pressure. To which he told me, this is the work of a minder, let him do it, I tell him, since you cannot do it and there is nothing to give advice, the minder himself knows what to do with the crankshaft.
I’ll give you advice, without a strong need, do not touch the factory crankshaft plugs, as they are pressed in by a special machine at the factory, and if you manually score them, there is a danger that they will fly out under oil pressure.
But if you knocked out the plugs from the crankshaft, then it’s right to hammer them in this way, do not hit the center of the plug, as the plug will stretch and weaken, take a mandrel along the diameter of the plug or a little more, and drive it in, removing it along the edges of the plug.
We washed the crankshaft as described above, and this is quite enough, and when you start driving with good oil, even if there is a small black deposit in the crankshaft, it will gradually be washed off without harm to the engine.
Once I had a case, I assembled the VAZ 2109 engine, began to flush the crankshaft, and one neck was very heavily clogged that gasoline, when flushing from the main neck, barely passed into the connecting rod. Then I thought that I would have to knock out the crankshaft plug and drill the soot, but I decided to try to blow it with a compressor, a wooden chop hammer was hammered on one side of the main neck, and a high-pressure hose from the compressor was tightly put into the other hole of the main neck, with a shot a plug flew out of the soot from the connecting rod cervix, and the canal is blown out. So I blew a clogged crankshaft.
If you do not have a compressor, then you can drive to any tire shop and blow out the crankshaft there.
Bottom line, only in very extreme cases, knock out the factory plugs from the crankshaft, if the channel is completely clogged and blowing does not help, also try to hammer the plug so that it is not squeezed out by oil pressure.
How to remove the crankshaft without removing the engine?
You can remove the crankshaft without removing the engine, but it's easier to remove the engine and then remove the crankshaft.
To remove the crankshaft without removing the engine, you need to remove the pan, gearbox, flywheel, rear cover with oil seal, front cover, remove the chain or timing belt, it depends on the engine model, connecting rod pads, and crankshaft pads.
As you can see, the crankshaft is not so easy to remove, if you do not remove the engine, it is easier to remove the engine than to remove everything that is described above and climb under the car.
If you buy a new crankshaft in a store, do you have to grind it or not?
The new crankshaft does not need to be ground, it is already ground for standard liners.
To change or not to change the connecting rod nuts?
If the threads on the bolts and nuts of the connecting rod are good, then you do not need to change them, and if they are bad, then you need to change the bot along with the nut.
How can I grind the crankshaft journal by hand?
I had one such case in practice, when I polished the crankpin by hand without a machine. Somehow relatives came to my friend for 1200 km. As the engine in their VAZ 2114 rattled already at a party due to the fact that when they went out into the countryside they hit the pallet on a stone. They bent the pan and the dent cut off the oil supply to the oil receiver, the oil flowed, but very weakly, which is why the second connecting rod rattled.
They brought me this car on Friday evening, and a friend asks, Sergey, I will help you, but relatives must definitely leave on Sunday. I tell him, so tomorrow is Saturday and the workshop is not working on boring crankshafts, he asks me to figure out how to do it without a machine, I tell him I’ll think about it in the evening and try to do it tomorrow. During the evening, I came up with 10 options, but settled on one, which seemed to me the fastest and most convenient.
Grinded the crankshaft neck like this.
He took off the pan without removing the engine from the car, untwisted the rattling connecting rod, looked at the liners, they turned out to be standard, climbed into his pile of scrap metal and found good 0.25 liners. I plugged the holes in the crankshaft necks with a rag, inserted the liners into the connecting rod and smeared them well with lapping powder for valves, slightly pulled the connecting rod on the crankshaft neck. He unscrewed all the candles and began to drive the crankshaft with a starter, drove for about two minutes with interruptions, again removed the pillow from the connecting rod and smeared the lapping powder again, again pulled the connecting rod pillow, and also began to drive with the starter. I did this until the connecting rod pillow sat completely on the connecting rod, then I removed the pillow and with a rag in gasoline removed all the lapping powder from the crankshaft and connecting rod bearings, pulled out a rag from the crankshaft neck, lubricated the liners with clean oil, twisted the connecting rod as expected, checked, the starter is turning. I leveled the pan and oil receiver, put everything in its place, started the engine, it worked great.
The next day, the relatives of a friend left home, and the car did not let them down, and they still drove it for half a year, and then they sold it, and the crankshaft was not repaired.
Should I change the connecting rods if I put in a new crankshaft?
If the connecting rods did not knock and the liners did not turn in them, feel free to leave the old connecting rods. The connecting rod must be changed if the liner has turned in it, if the connecting rod has knocked, but the liner has not turned, you can safely put this connecting rod back. When the liner in the connecting rod rotates, it gnaws out part of the metal, then the connecting rod must be thrown out and replaced with a new one. And if the liner has not turned in the connecting rod, its size remains normal, and it can be safely put back. This is my personal experience for over 20 years of practice in engine repair.
Why is there no hole in one main journal in the VAZ crankshaft?
Holes in the crankshaft for supplying oil from the main journals to the connecting rods. Since there are four connecting rods in the engine, therefore there are four holes in the main journals. Therefore, the central neck without holes, the oil supply goes only to this neck.
Why, after 90 degrees, does the oil pressure lamp of the VAZ injector burn after the capital?
Most likely, there is no smell of capital here, but new liners were put on the worn crankshaft. This engine needs to be rebuilt by boring the crankshaft. If the crankshaft was sharpened, then the borer made a mistake in the tolerances, removed excess metal, thereby weakening the crankshaft journals, so the oil pressure lights up at a temperature of 90 degrees.
Why did the Zhiguli liners have holes before, now they don't?
Because the holes on the second liner are not needed. Lubrication of the liner and crankshaft journals enters through the through hole into the crankshaft journals. The top bearing has a bored hole, pressurized oil enters the main journal bore, lubricating the crank journal and the non-hole lower bearing through the through bore of the main journal.
But why they didn’t make a groove in the lower liners of the Volga in the 402 engine, I don’t know, the crankshaft main journal in these engines is not through, the hole is only on one side. It turns out that the oil supply of the crankshaft crankpin goes on impulse when the neck hole passes through the upper liner with holes. The lower liner without a groove is lubricated with oil dragging the crankshaft neck behind it, of course this causes a slight starvation in the oil of the lower liner.
CRANKSHAFT 21213
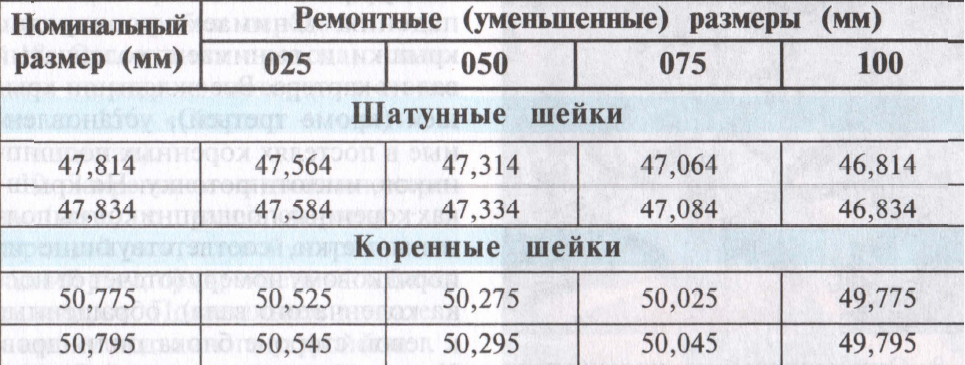
For crankshafts of engines 21213, the diameter of the main journals (mm) is:
normal size .................................50, 799 - 50, 819
repair (-0, 25) .............................. 50, 549 - 50, 569
repair (-0, 50) .............................. 50, 299-50, 319
repair (0, 75).......................................50, 049-50, 069
repair (-1, 00)....................................49, 799-49, 819
Diameter of connecting rod journals (mm):
normal size..............................47, 83 - 47, 85
repair (-0, 25).................................. 47, 58 - 47 .60
repair (-0, 50).......................................47, 33 - 47, 35
repair (0, 75).......................................47, 08-47 , 10
repair (-1, 00).................................. 46, 83 - 46 .85
The nominal design clearance in connecting rod bearings is 0.02-0.07mm, and in main bearings - 0.026-0.073mm. Limit clearances (wear) are 0.1 mm for connecting rod and 0.15 mm for main journals.
Camshaft and its drive
The camshaft of the 21213 engine differs from the 2121 in a different angular arrangement of the cams, since the 21213 engine has different valve timing.
The camshaft drive has features in the repair of the chain tensioner. In it, the plunger is kept from falling out of the body not by a retaining ring (as on engines 2121), but by punching the body at three points. To disassemble the tensioner, file the edges of the body in the places of punching. After installing the plunger tensioner in the body, it is necessary to punch out the body at three points. In this case, the protrusions from the punching should not touch the surface when the plunger moves.
Crankshaft VAZ classic

Rice. The main dimensions of the connecting rod and main journals of the crankshaft and their fillets VAZ 2103

Rice. Permissible runout of the main surfaces of the crankshaft
DIAMETERS OF THE ROD JOINTS, mm
|
Nominal |
reduced |
|||
DIAMETERS OF MAIN JOURNS, mm
|
Nominal |
reduced |
|||
Crankshaft VAZ 08-09

Rice. The main dimensions of the crankshaft VAZ 08-09
DIAMETERS OF THE ROD JOINTS, mm
|
Nominal |
reduced |
|||
DIAMETERS OF MAIN JOURNS, mm
|
Nominal |
reduced |
|||
How to remove the bearing from the crankshaft VAZ 2109?
There is no bearing in the VAZ 2109 crankshaft.
Grinding the crankshaft at home. Video.
Gorobinsky S.V.

1. Clear a deposit on the edges of beds of the block of cylinders. Clean deposits from oil grooves in beds.
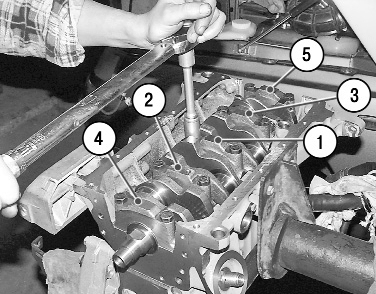
2. Establish loose leaves of radical bearings in bed of the block of cylinders according to the labels made at dismantling. Please note that the middle liner 1 is without a groove. When installing the liners, their locking antennae must enter the grooves of the beds. Lubricate the liners engine oil.


3. Install the crankshaft in the cylinder block.
4. Grease persistent half rings with engine oil. Pay attention to the grooves of the half rings - these sides of the half rings are installed to the cheeks of the crankshaft.


5. Install a steel-aluminum half ring (white) from the front side of the middle bed (camshaft drive side) ...
6. ... ceramic-metal (yellow) - on the other side of the bed.


7. Turn the half rings so that their ends are flush with the ends of the bed.
8. Insert loose leaves into covers of radical bearings according to the labels made at dismantling. In this case, the locking antennae of the liners should enter the grooves of the covers. Lubricate the liners with engine oil.

9. Install the covers according to the marks. The covers are marked (notches) in accordance with the cylinder number. The exception is the fifth cover, on which two marks are applied, as well as on the second one. On the second cover there are two threaded holes for the oil receiver mounting bolts. In this case, the cylinder numbers are considered from the camshaft drive side, and the covers are installed with marks 1 towards the generator bracket 2.
10. Grease with engine oil a carving and end faces of heads of bolts of fastening of covers.
11. Screw the bolts and tighten them to the required torque (see Appendix 1) in the following order: first tighten the bolts of the third cover 1, then the second 2 and the fourth 3, then the first 4 and the fifth 5. After tightening the bolts, turn 2-3 turns crankshaft - it should rotate easily, without jamming.
12. For ease of installation, lubricate the oil pump gasket with a thin layer of grease and "glue" it to the block. Remove excess grease.
14. For ease of installation, lightly grease the rear oil seal retainer gasket and “glue” it to the block. Remove excess grease.

4.14. Device for pressing the piston pin: 1 - roller; 2 - piston pin; 3 - guide sleeve; 4 - screw; 5 - remote ring

16. Insert the connecting rod into the piston in accordance with the marks previously made so that the part number 1 on the connecting rod is facing away from the lug 2 on the piston boss.
17. To press the piston pin, it is better to use a special tool (). In its absence, you can choose a suitable mandrel. Put the piston pin 2 on the shaft 1 of the piston pin installer with the distance ring 5 put on it. Then put on the guide sleeve 3 and fix it with the screw 4 without tightening the screw. Distance ring dimensions: outer diameter 22 mm, inner diameter 15 mm, thickness 4 mm.


18. Heat the connecting rod head to 240°C in an oven for 15 minutes. Clamp the connecting rod in a vise, install the piston on it so that the holes for the pin coincide, and insert the fixture with the finger into the holes of the piston and connecting rod until it stops. To properly install the pin, the piston must be pressed with the boss against the upper head of the connecting rod in the direction of pressing.
19. After the connecting rod has cooled, lubricate the piston pin through the hole in the piston bosses.


20. Install retaining rings on both sides of the pin. At the same time, pay attention that the rings must be clearly installed in the piston grooves.
21. Install the oil scraper ring expansion spring on the piston.


23. The order of installation of rings: first install oil scraper ring(in this case, the lock of the ring should be on the opposite side of the lock of the expanding spring), then the lower compression ring, the last - the upper one.


24. At the same time, please note that the inscription “VAZ”, “TOP” or “TOP” can be embossed on the rings. With this inscription, the rings are installed upwards (towards the piston crown). If there is no inscription, the oil scraper and upper compression rings can be installed in any position.
25. The lower compression ring differs from the upper one except for the thickness by the presence of a groove and is installed with this groove down.
26. After turning the rings in the piston grooves, make sure they rotate easily. If any ring does not turn or sticks, it must be replaced.


27. Turn the rings on the piston so that their locks are located at an angle of 120 ° to each other.
28. Thoroughly wipe the connecting rod journals of the crankshaft with a clean cloth.
29. Thoroughly wipe the cylinder mirrors with a clean cloth and lubricate them with engine oil.
30. Insert the liner into the connecting rod in accordance with the previously made marks so that the liner antenna fits into the groove in the connecting rod. Then lubricate the liner and piston with engine oil.


31. Put a compression mandrel on the piston piston rings and carefully lower the connecting rod into the cylinder. It is recommended to pre-turn the crankshaft so that the piston to be installed is at BDC. In this case, the arrow on the bottom of the piston must be directed forward of the engine (towards the camshaft drive).
32. Firmly press the mandrel against the block and use the hammer handle to push the piston into the cylinder. If the mandrel does not fit snugly against the cylinder block, piston rings can be broken.


33. Establish the lower head of a rod on a neck of a cranked shaft.
34. Insert the liner into the connecting rod cover in accordance with the previously made marks so that the liner antenna enters the groove in the cover. Then lubricate the bearing with engine oil.
Algorithm of work performed on a VAZ car for dismantling and installing a crankshaft when replacing worn liners.
Symptoms:
a sharp decrease in engine oil pressure;
muffled metallic thuds and rumbles.
Statement of reasons: liners are worn out or the crankshaft of the power plant is damaged.
Tools necessary for repair work: a set of ring and socket wrenches, a measuring tool (preferably electronic), screwdrivers in stock.

Execution of work must be carried out on a flyover (inspection hole), having previously de-energized the vehicle by breaking the connection between the battery and the body (dropping the minus from the battery).
1. The pallet is dismantled (observing environmental requirements) of the crankcase of the power unit.
2. Dismantling of the part: oil seal holder, made in the form of an oil seal, located at the rear of the crankshaft.

3. Screwing off the cover from the camshaft and removing the sealing gasket. This operation is followed by removal of the link structure from the crankshaft pulley gear.
4. At this stage, it is necessary to set marks to fix the placement of the connecting rods and their covers, as well as fixing the relative position of the covers (K - hereinafter used in the meaning of the main one) of the bearings regarding the engine cylinder block.
5. Screwing the two nuts that secure the connecting rod cap with a 14 socket wrench.
6. Dismantling the connecting rod cap in combination with the liner.

7. We disconnect all subsequent connecting rods from the shaft, and then, shifting them in the vertical direction, we remove the liners from under the connecting rod caps.
8. We loosen the bolts securing the covers (K) of the bearings using a socket wrench of 17
9. We screw together two fixing rods with an external thread and remove the cover of the rear (K) shaft bearing. We pay special attention to two thrust half rings installed in the grooves of the rear crankshaft bearing. The ring made of an alloy (metal + aluminum) is the first, and the second is made of cermet. The extraction of these rings is carried out by squeezing the edges with a small screwdriver.

Screwing rods with external thread from subsequent caps (K) of bearings, excluding the possibility of damage to the motor shaft. We carry out the chronological dismantling of the caps and the extraction of the shaft from the crankcase grooves.
Attention is focused on the location of all the liners of the caps (except for the 3rd one) in the "beds" (K) of the shaft bearings with reciprocal grooves.
Particular emphasis should be given to the note left on the bearing cap indicating its numbering (it is made from the “nose” of the shaft and the marks are turned to the left). Exception - the fifth cap has two notes spaced at the edges
To replace the liner with a repair one, the liner is first removed from the connecting rod and only then the liner is removed from the cylinder block (K).
Inspection and Troubleshooting
We make a thorough inspection of the crankshaft: there should be no damage on the cheeks and necks. Identification of defects dictates its replacement with a new one.
The use of a micrometer and tables in the data sheet for vehicle allows you to compare the actual dimensions of the diameters of the main (K) and connecting rod (W) caps with their tabular values. Thinning or changing the configuration in favor of an oval by more than 0.03 mm prescribes that the necks be ground in a car repair organization.
The ground crankshaft is again measured to establish the exact size of the repair liners.
The crankshaft is thoroughly washed in kerosene and blown by a compressor. After that, the inserts of the main (K) bearings of the repair or standard size are installed.
Note: It is important to know that the outer cylindrical side of the liners is marked with numbers. They set the repair size: 0.25 - the first number that goes under the "neck" of the crankshaft, which has decreased in diameter by 0.25 mm. In this condition, the subsequent repair dimensions will correspond to the numbers: 0.5; 0.75; 1.
Confusion between main (K) and connecting rod (W) bearings must not be allowed. The inner main liners (except for the middle one) have annular grooves. In addition, the inserts of the middle support differ from the rest in an increased width.
Inserts for connecting rods are universal, as they are made in one size. Their difference from the indigenous ones is visually easy to identify: much smaller in diameter and do not have annular grooves.
Install a semi-ring for a stop in the grooves of the "bed" (K) of the bearing (5th), directing the grooves to the crankshaft. These semirings (crescents) are:
thickened - 2.437-2.487 mm;
standard - 2.310-2.360 mm.
Checking the center clearances between the thrust surface of the crankshaft and the crescent. The gap range is within 0.06-0.26 mm. Half rings of standard thickness are subject to replacement if the gap is greater than 0.35 mm. The replaced crescents are 0.127 mm thicker than the previous ones. Next, the crankshaft is installed with the connecting rod and main “necks” pre-lubricated with engine oil into the block. After that, starting from the marks, the main bearing caps are installed, after which the bolts are screwed and fastened (tightening 68.4-84.3 N.m). Make sure that the shaft does not encounter obstacles and excessive resistance during rotation.
The next step we will have is to install the connecting rods together with the caps and liners on the crankshaft and tighten the fixing nuts (tightening 43.4-53.5 N.m), after which we install the oil pan. Next, we fix the holder together with the rear oil seal on the cylinder block and further assembly is carried out in the reverse chronology. The system is filled with engine oil.
Using the technical documentation, adjust the tension of the gas distribution mechanism (timing) chain and the generator drive belt, which provides electrical energy.
If necessary, precise adjustment of the ignition timing (ignition setting) is carried out.